Selling wholesale through Shopify B2B is a powerful way to support your retail network – but adding these B2B retail partners to your store locator map still requires hours of manual work. While it's valuable to point customers to local retailers who stock your products, keeping your store locator map updated can be tedious and time-consuming. That’s why we built the Dynamic Store Locator app to integrate directly with Shopify B2B, enabling Shopify merchants to automatically sync and display their Shopify B2B retailers on a store locator map – no spreadsheets, manual data entry, or any need for ongoing upkeep. Once connected, it continuously updates, adding new retailers as they purchase through your Shopify B2B store and automatically hiding retailers after they have not purchased for 6 months or more.
In this guide, we’ll walk you step-by-step through the process of connecting your Shopify B2B Company listings with the Dynamic Store Locator app. By the end of this walkthrough, your Shopify B2B company list will be seamlessly integrated with your store locator map.
Before You Begin…
You need to understand that there are two different installation paths for integrating Shopify B2B with the Dynamic Store Locator app. And it’s very important that you follow the correct path to ensure that the integration works.
Which installation path do you follow?
You need to answer this question first: Do you have a single Shopify store where you sell to both consumers and B2B customers, or do you have a separate Shopify store to support your wholesale business?
We ask this question because we often find that store owners have two Shopify stores: one store for retail customers and one store for B2B customers. However, they want to pull their B2B retailers’ locations into their store locator map on their retail store where they sell to regular consumers.
- Use PATH 1… if you have one Shopify store, and your Shopify B2B customers exist in the store where you’ve downloaded and will display your Dynamic Store Locator map.
- Use PATH 2… if you have multiple Shopify stores, and your B2B customers exist on a different Shopify store than the store where you’re going to display your Dynamic Store Locator map.
PATH 1: My Shopify B2B Customers are in the same Shopify account as my retail customers, and I want the Dynamic Store Locator map to appear on this store.
Because we want your integration to be successful, again, you should follow the below steps only if your B2B retailers are customers of the same store where you’re loading the Dynamic Store Locator app.
STEP 1: Open the App and Go to the Integrations Page
Open your Shopify Admin dashboard, on the left menu panel click “Apps” and then select “Dynamic Store Locator” from the app menu.
If you haven’t yet installed the app, then you can download the Dynamic Store Locator in the Shopify App Store here.
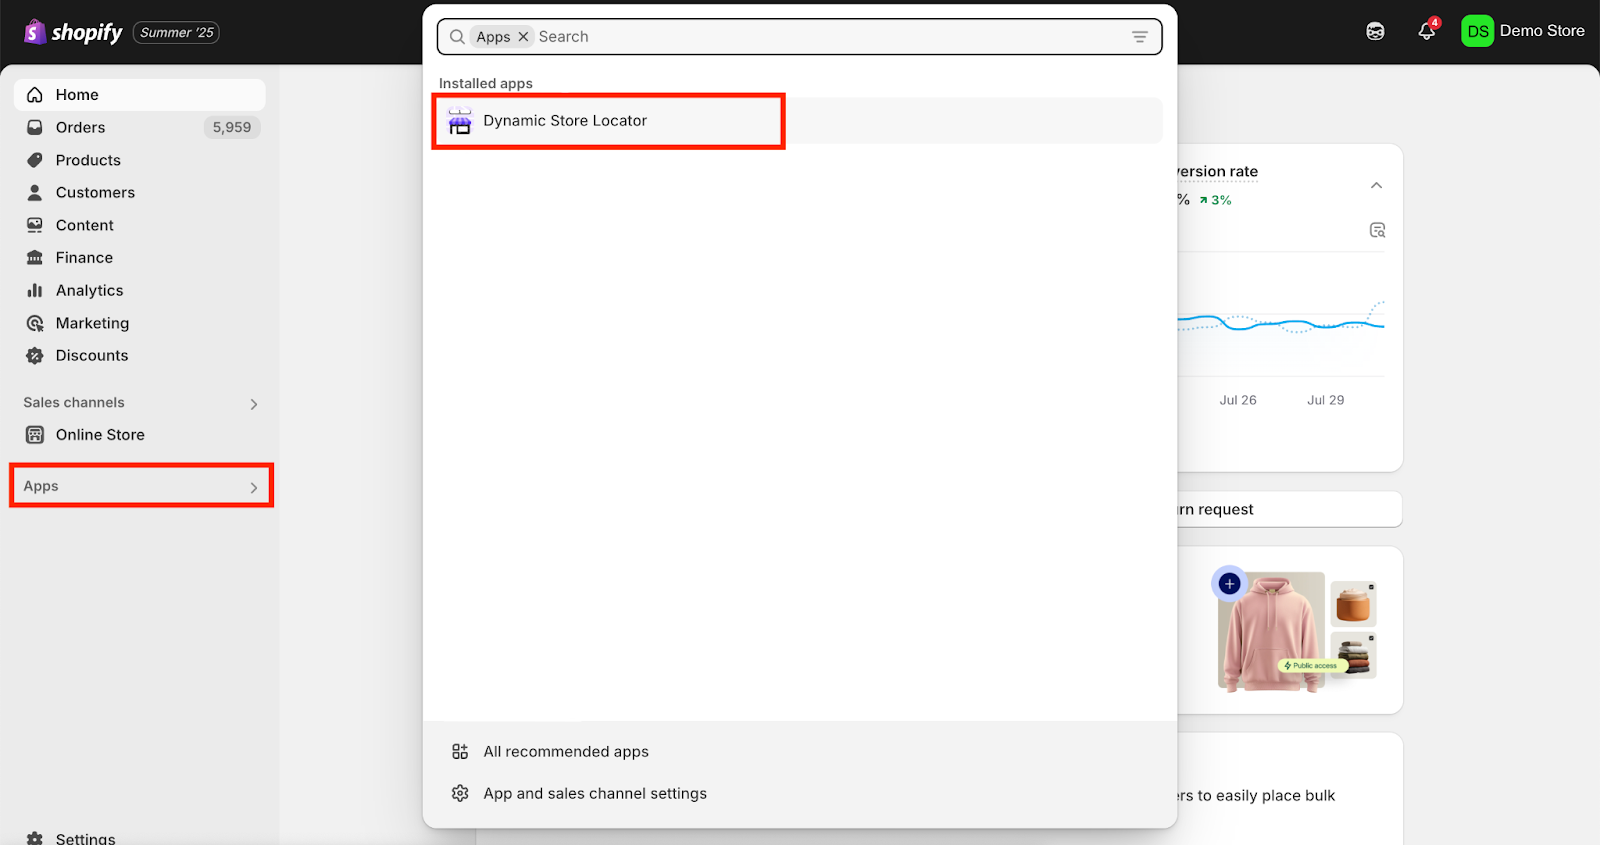
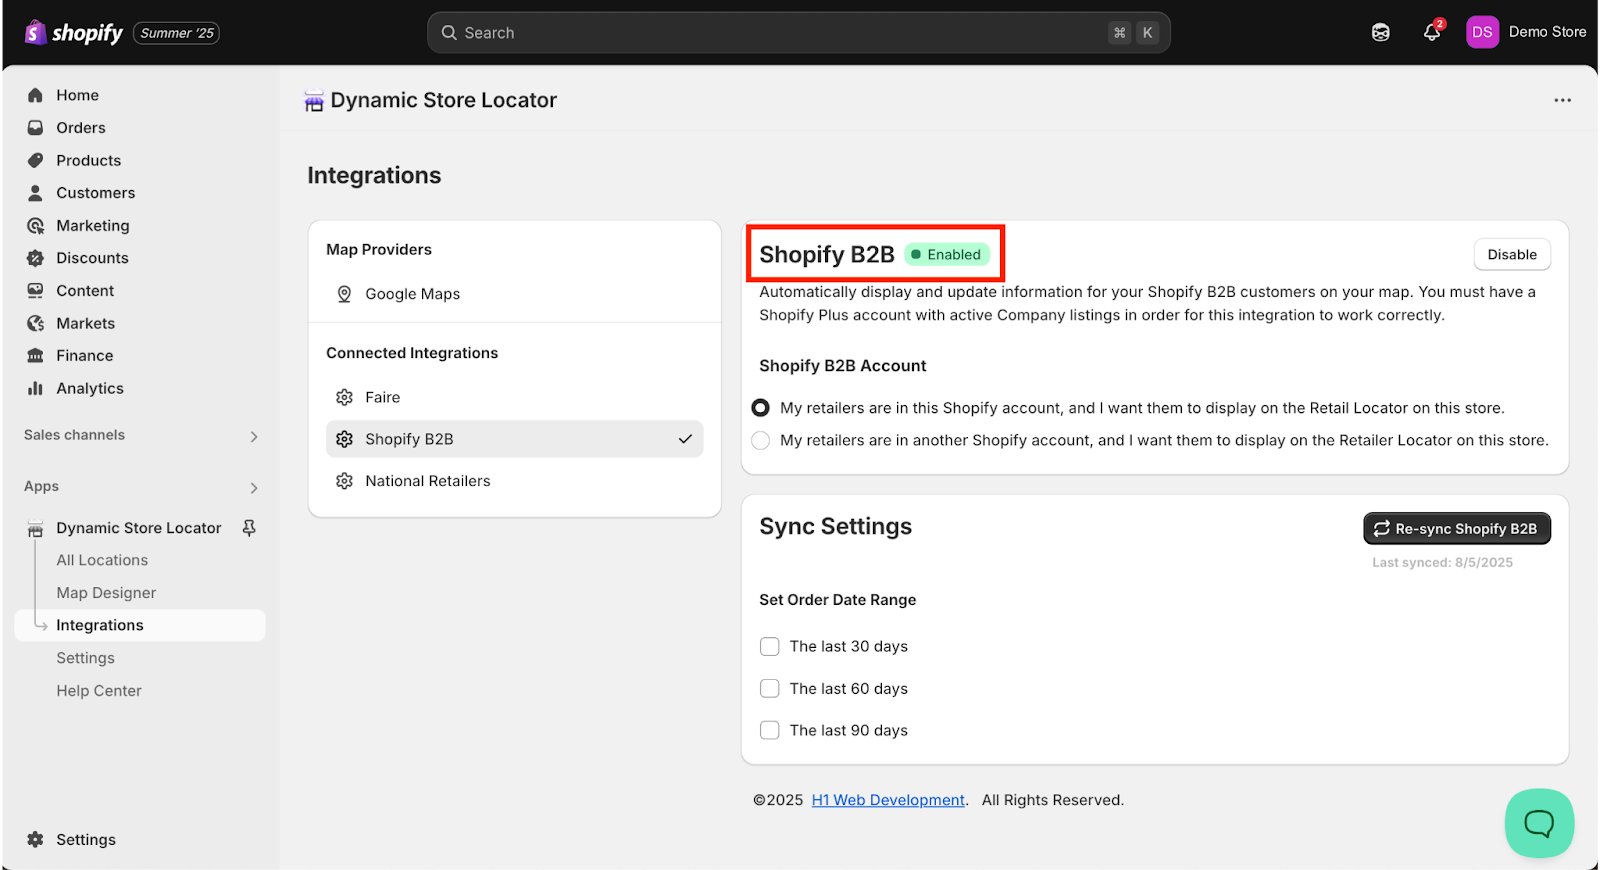
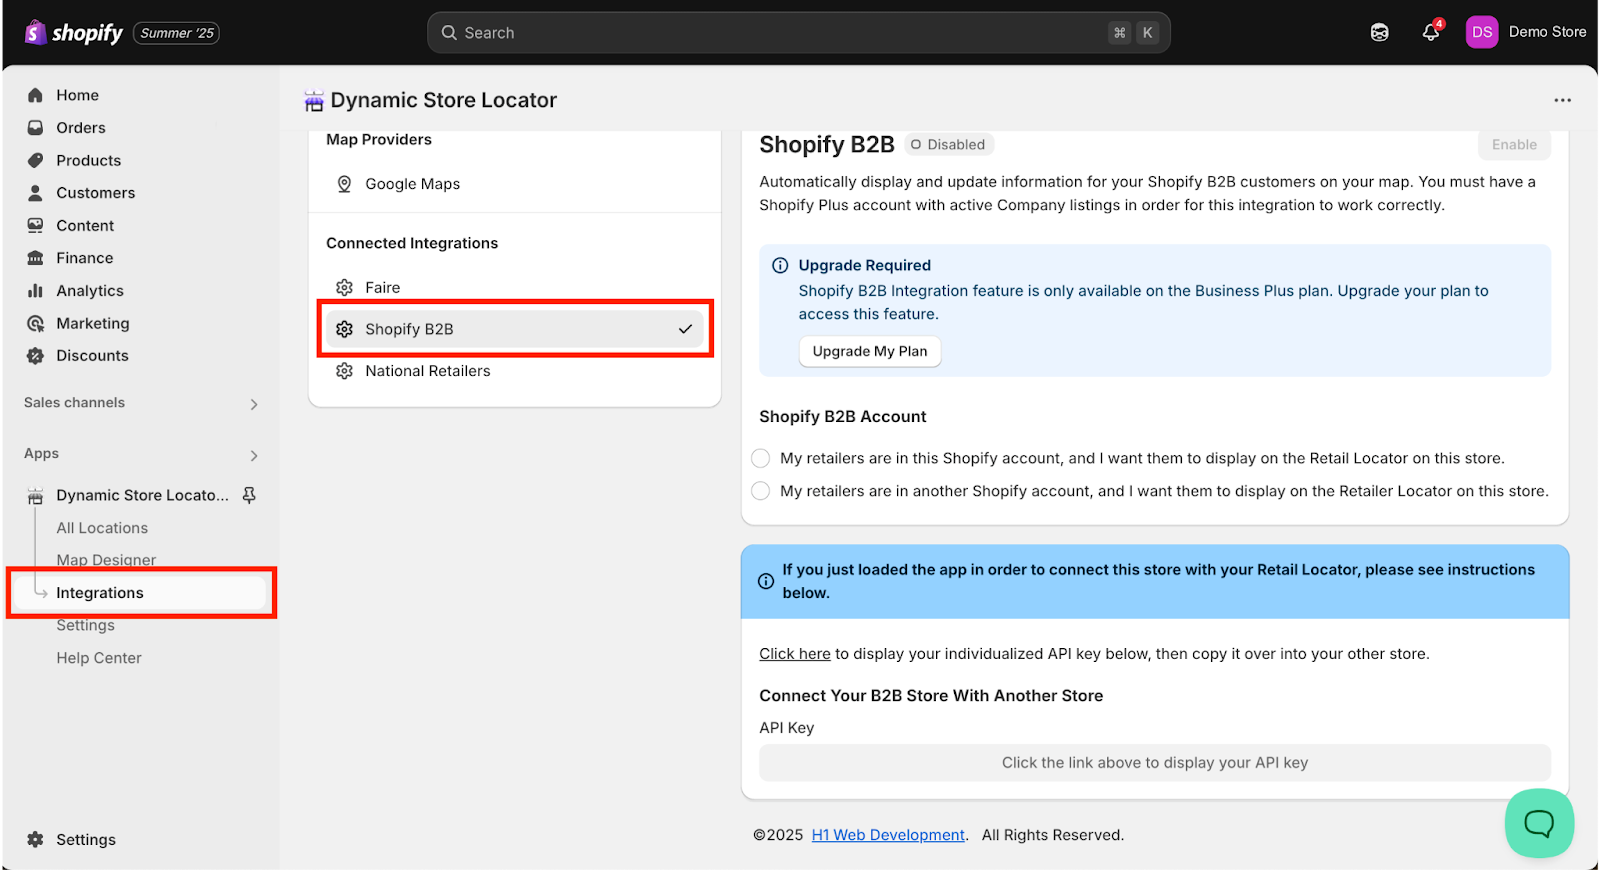
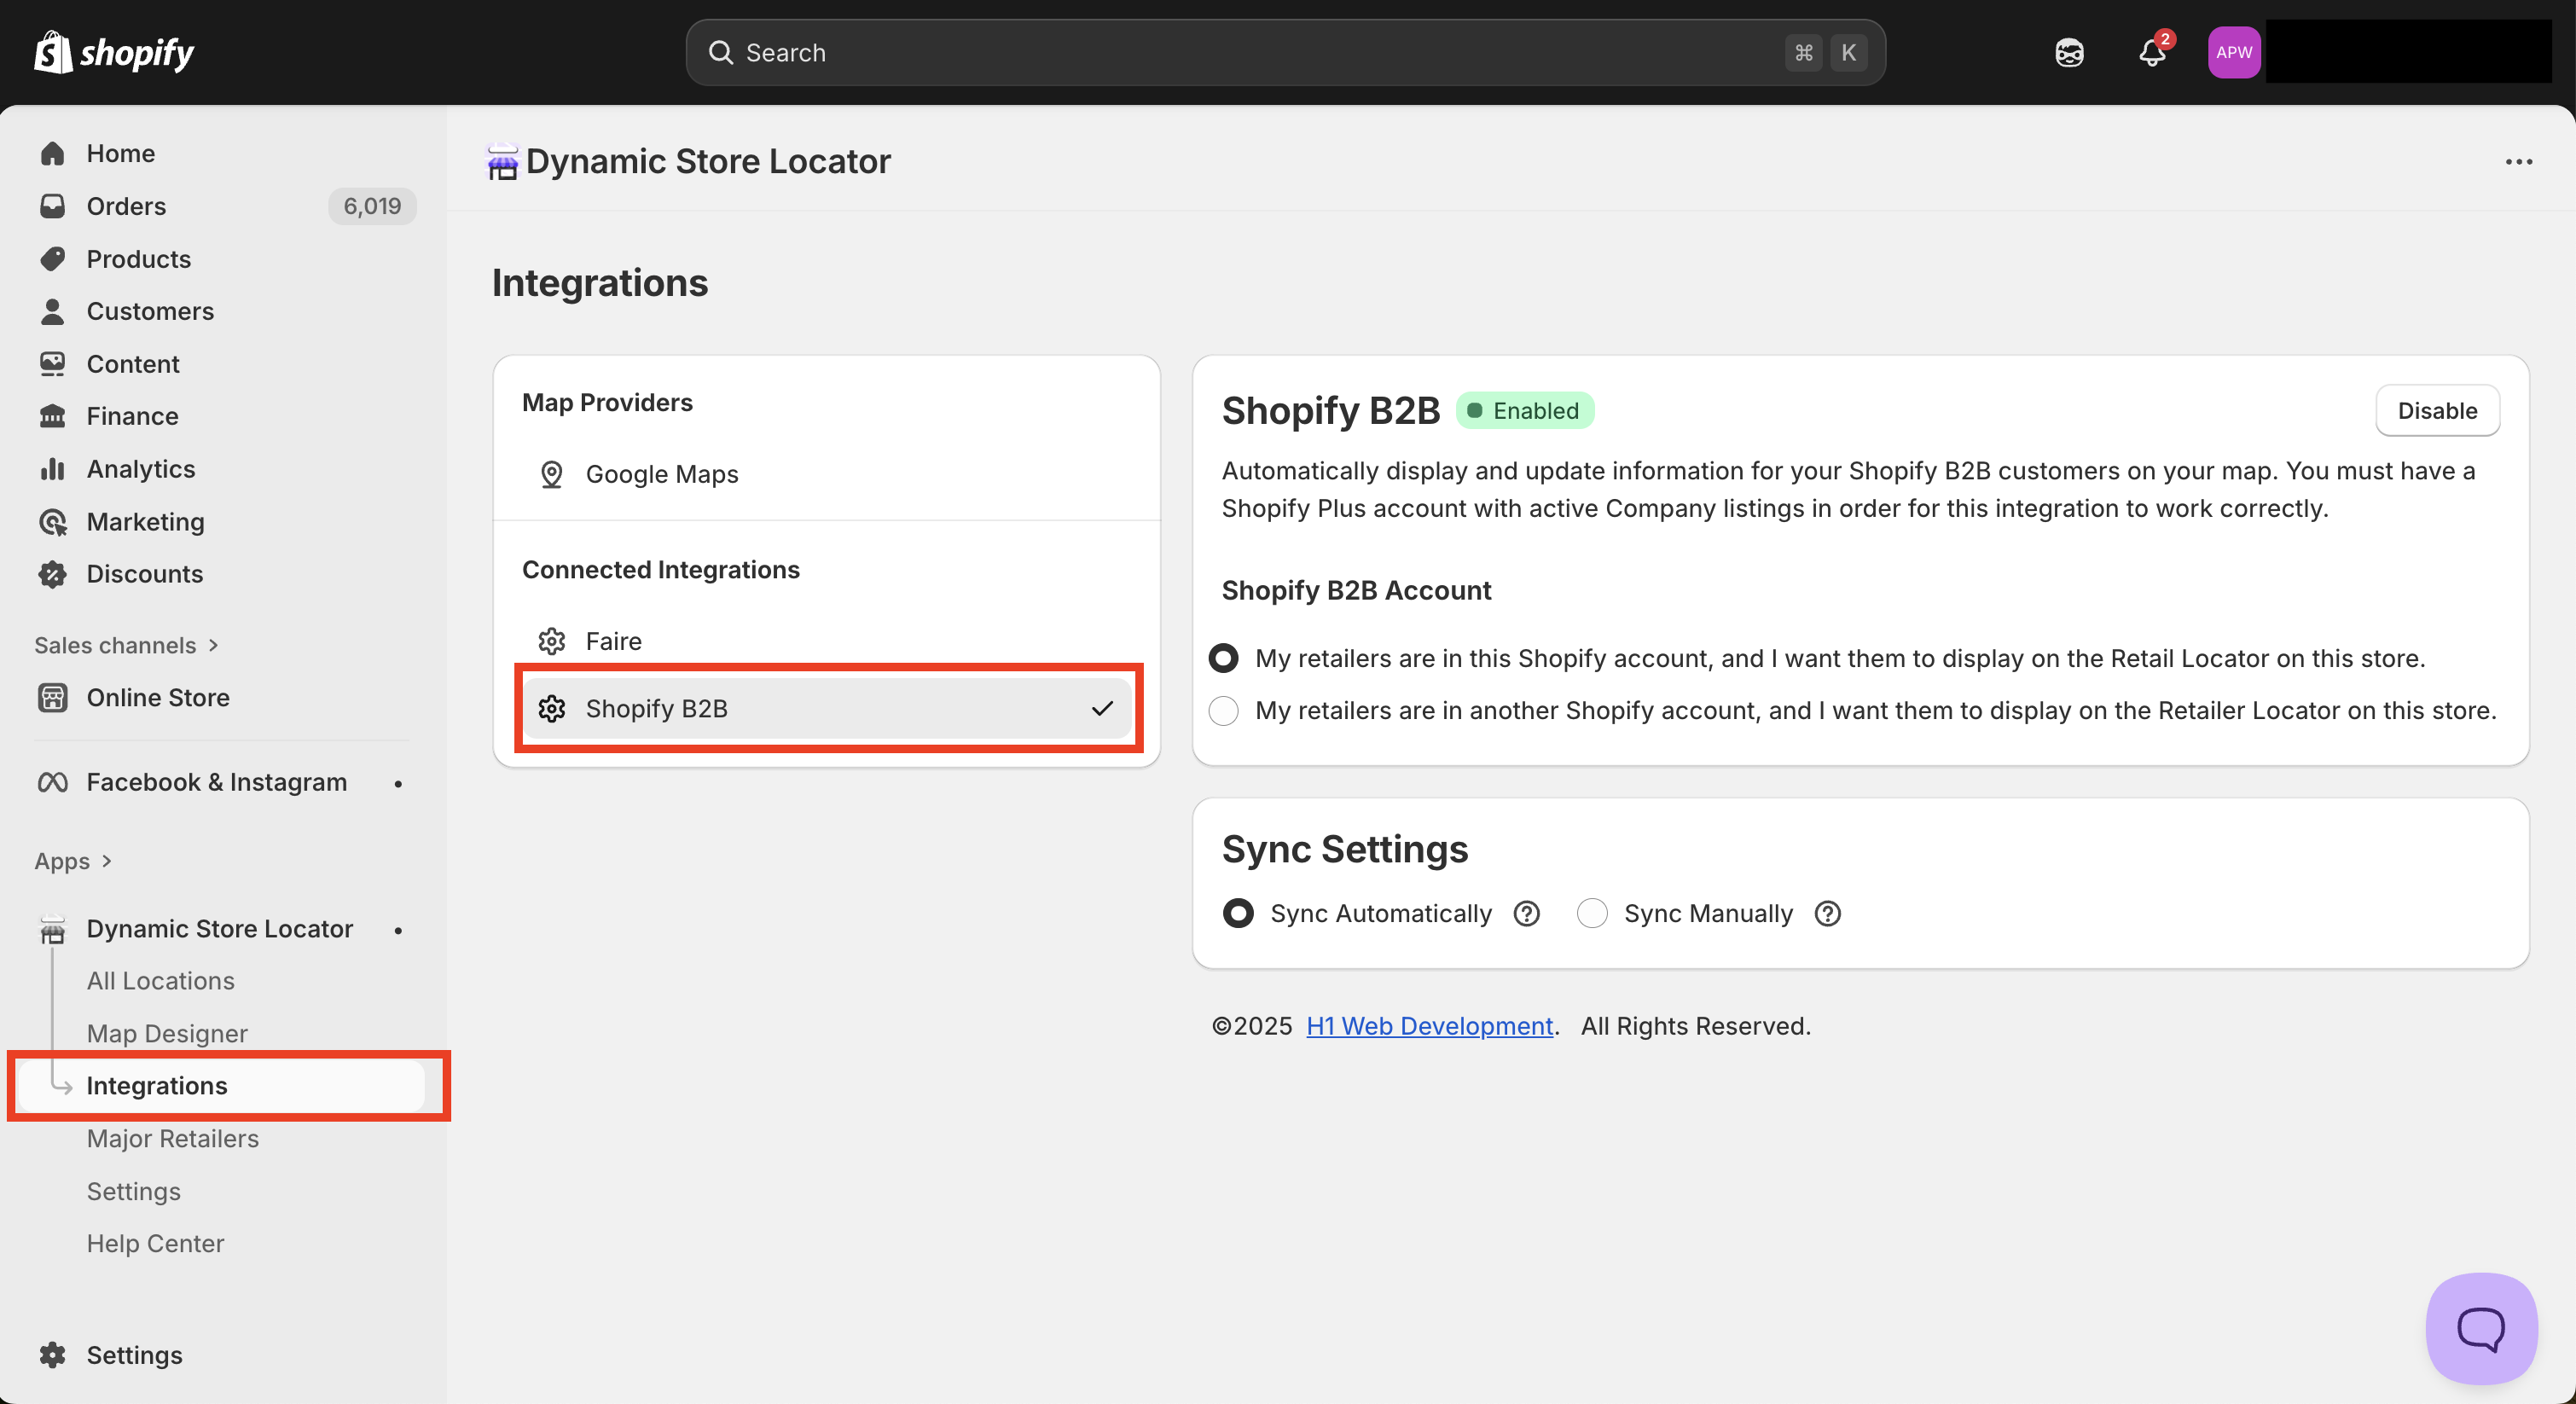
Once you’ve opened the app, from the app’s menu panel on the left side, click on the “Integrations” tab. Then, click on “Shopify B2B” under “Connected Integrations”.

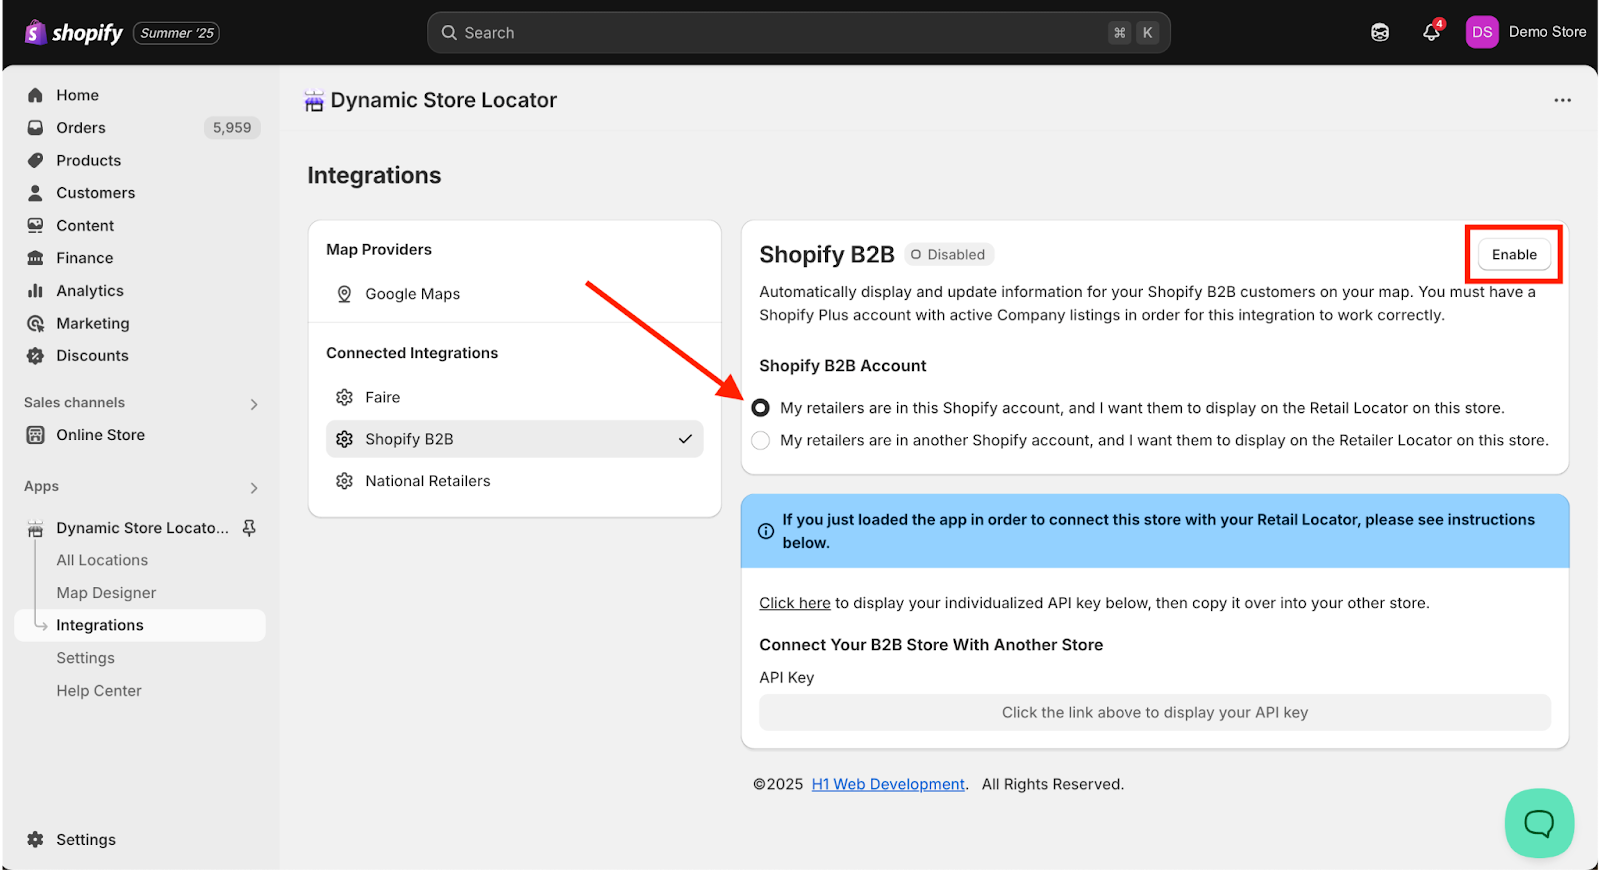
STEP 2: Integrate Shopify B2B
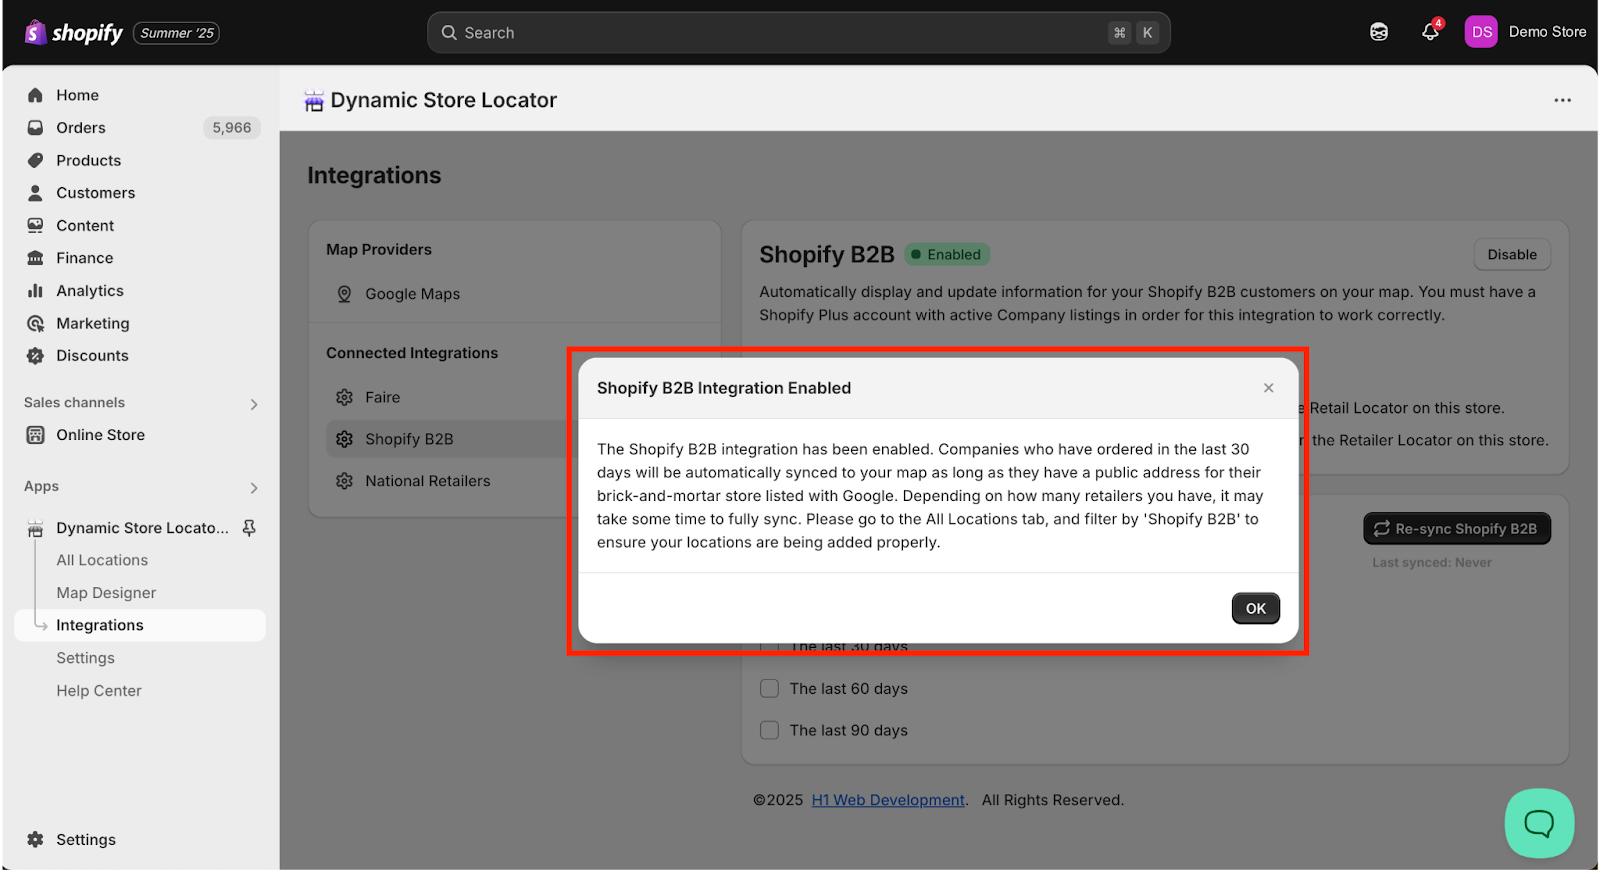
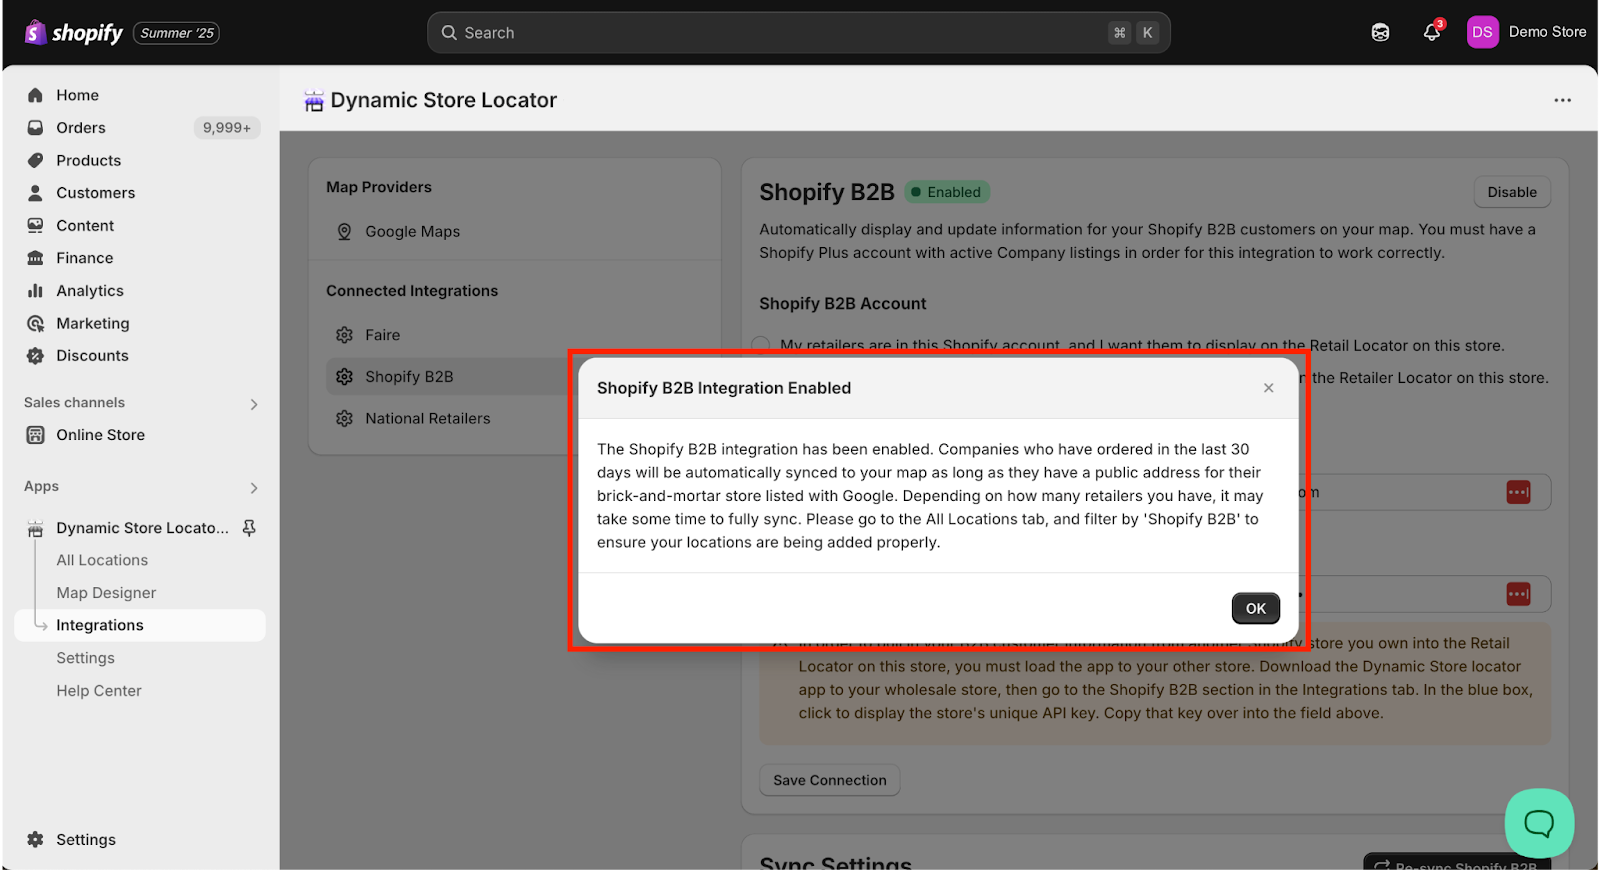
Check the box next to the option: “My retailers are in this Shopify account, and I want them to display on the Retail Locator on this store.”
Click “Enable”.
Please note: If the “Enable” button is greyed out and you’re unable to click on it, then you’re not on the required app plan. You must be on the Business Plan to use the Shopify B2B integration. To upgrade your app plan, on the left menu panel for the app, click “Settings” > “Plans” and proceed to upgrade your plan.
STEP 3: Patiently Await Data Transfer
After you’ve enabled the Shopify B2B integration, the app will automatically start syncing retailers who’ve purchased from you in the past 30 days. The time it takes for the app to fully sync your Shopify B2B retailers depends on the number of retailers in the sync. Please be patient.
IMPORTANT NOTE: By default, the Dynamic Store Locator app checks each Shopify B2B retailer’s shipping address on-file against Google Business to ensure that the company has a public, open-for-business brick-and-mortar retail store with a Google Business listing. If their Google Business listing has a status of “permanently closed”, then we will exclude them from syncing. Any retailer listed as “temporarily closed” will still be pulled in. You can turn this feature OFF in the app settings if you want ALL retailers to be synced from Shopify B2B. You can always manually hide individual retailers using the eyeball icon in the locations table.
Why do we verify Shopify B2B retailer addresses against Google?
Because we understand that many purchasers on Shopify B2B may ship to a warehouse or home address that lacks a storefront, and you don’t want to point your customers to a retailer’s personal home or warehouse address.
Therefore, if one of your Shopify B2B retailers isn’t being pulled into the Dynamic Store Locator app, then it’s because the company doesn’t have an associated Google Business listing. If you believe there is an error, you may bypass this by manually adding the location. Or, you can turn this feature OFF in the settings to sync all retailers.
Now that you’ve connected your Shopify B2B retailer listings, you may skip the PATH 2 section of this tutorial, and scroll down to our instructions on viewing/editing these synced locations and updating the sync settings to include Shopify B2B retailers from more than 30 days ago.
Troubleshooting
I’m not seeing any locations sync even though I have Company listings.
During the initial sync, the app only syncs company listings with orders in the last 30 days. If a company has not placed an order in the last 30 days, or has never placed an order, they will not be synced. Additionally, if the company does not have an active Google Business profile that our system was able to match using name, shipping city and state, the listing will not sync. You may turn the Google Business verification feature OFF in the settings, then click the Re-Sync button to sync all customers with orders in the last 30 days.
PATH 2: My Shopify B2B Customers are in a different Shopify account than my retail customers.
Again, you should only follow the below steps if your B2B retailers exist in a different Shopify store than the store where you’re loading the Dynamic Store Locator app, and you want them to show in the store where you initially loaded the app.
STEP 1: Download the app to both your B2C and B2B stores.
If you haven’t yet installed the app, then you can download the Dynamic Store Locator in the Shopify App Store here.
STEP 2: Generate An API Key On Your B2B Store
Please Note: You don’t need to pay for an Advanced Plan on this store if it’s not where you’re going to be displaying your store locator map. You can generate an API key on the basic, free plan.
On the store where your Shopify B2B retailers exist, open your Shopify Admin dashboard, on the left menu panel click “Apps” and then select “Dynamic Store Locator” from the app menu.
Once you’ve opened the app, from the app’s menu panel on the left side, click on the “Integrations” tab. Then, click on “Shopify B2B” under “Connected Integrations”.
Please Note: Again, you can disregard the “Update Required” message if you don’t plan to display a Dynamic Store Locator map with the B2B retailer listings on your B2B site.
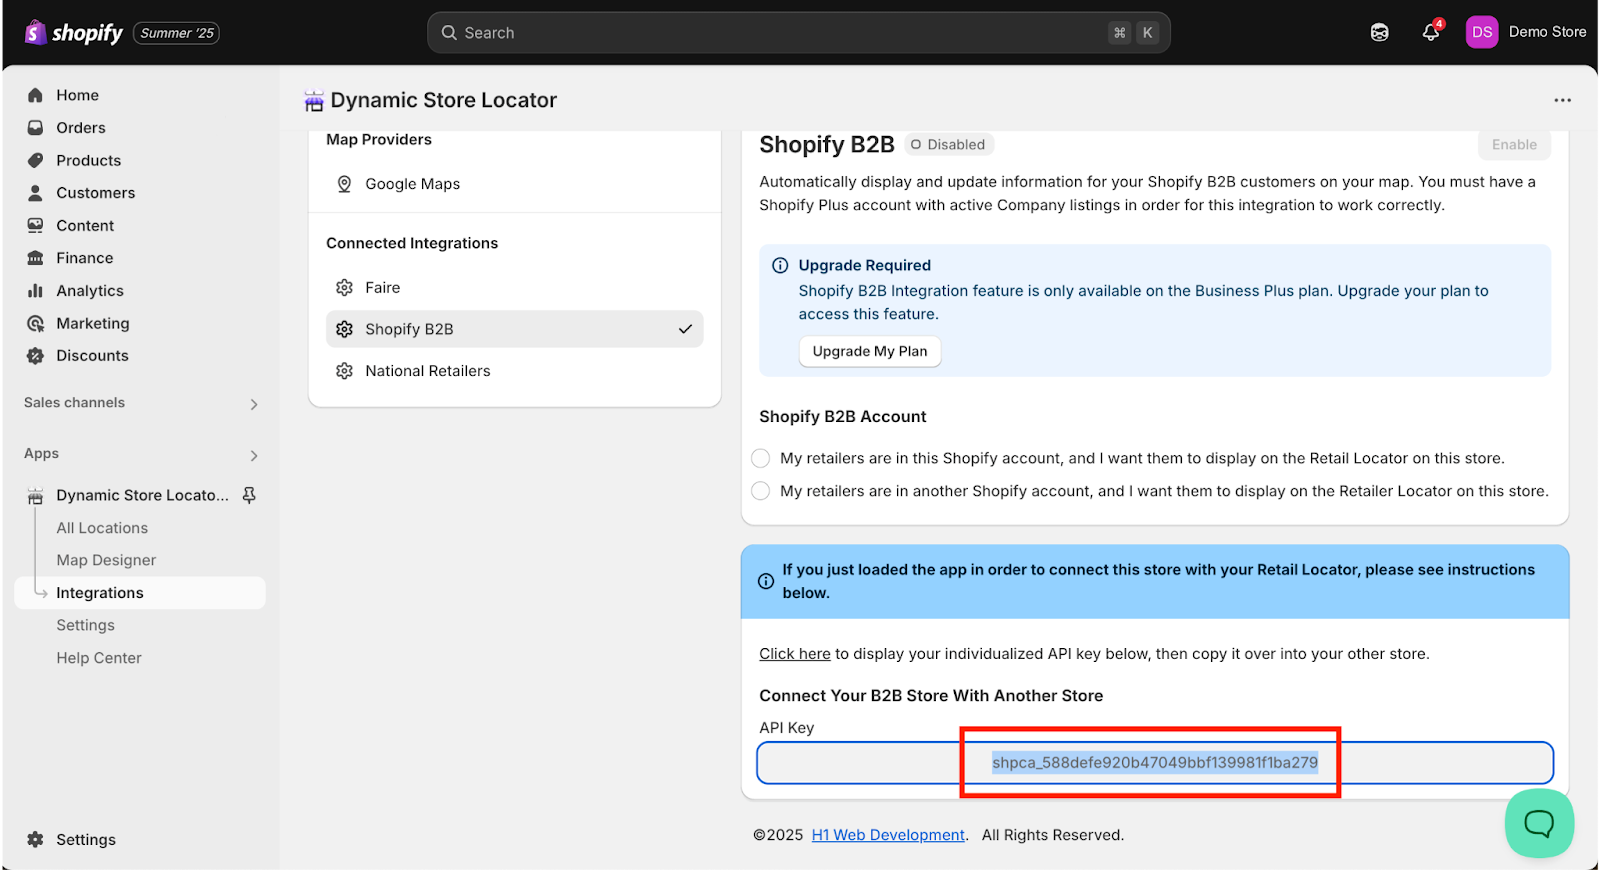
In the box with the blue header, click on the hyperlinked “Click here” text to generate your API Key.
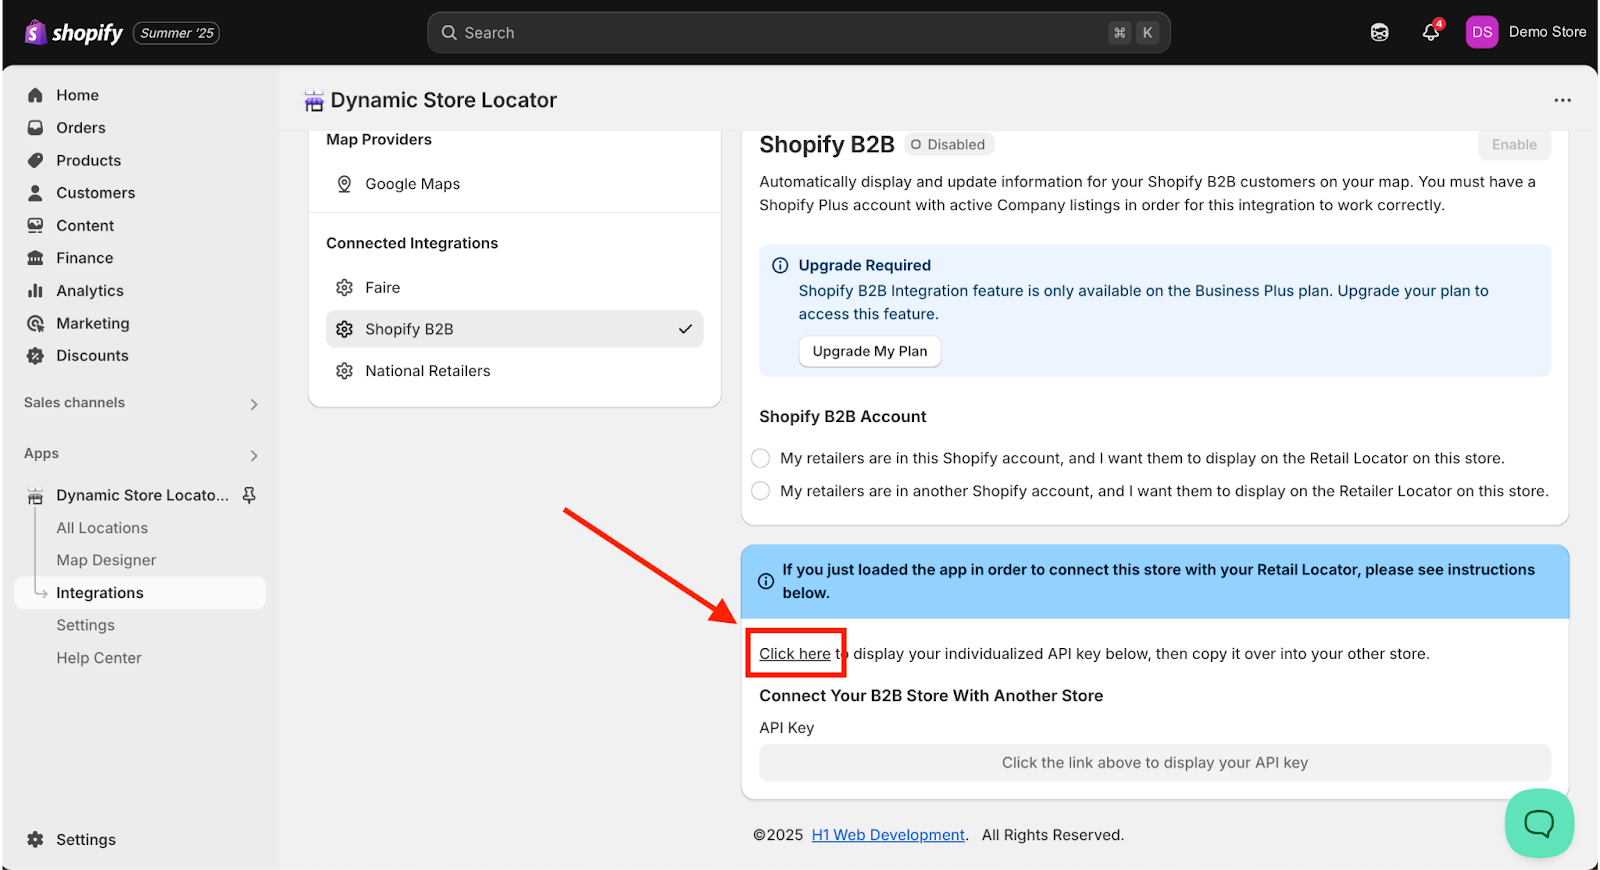
Copy the text in the API Key field. You’ll need this in the next step.
STEP 3: Connect Your B2B Store Data to Your Consumer-Facing Retail Store Using the API Key.
On your other store where you’re loading the Dynamic Store Locator map, open your Shopify Admin dashboard. On the left menu panel click “Apps” and then select “Dynamic Store Locator” from the app menu.
Once you’ve opened the app, from the app’s menu panel on the left side, click on the “Integrations” tab. Then, click on “Shopify B2B” under “Connected Integrations”.
Please note: If the “Enable” button is greyed out and you’re unable to click on it, then you’re not on the required app plan. You must be on the Business Plan to use the Shopify B2B integration. To upgrade your app plan, on the left menu panel for the app, click “Settings” > “Plans” and proceed to upgrade your plan.

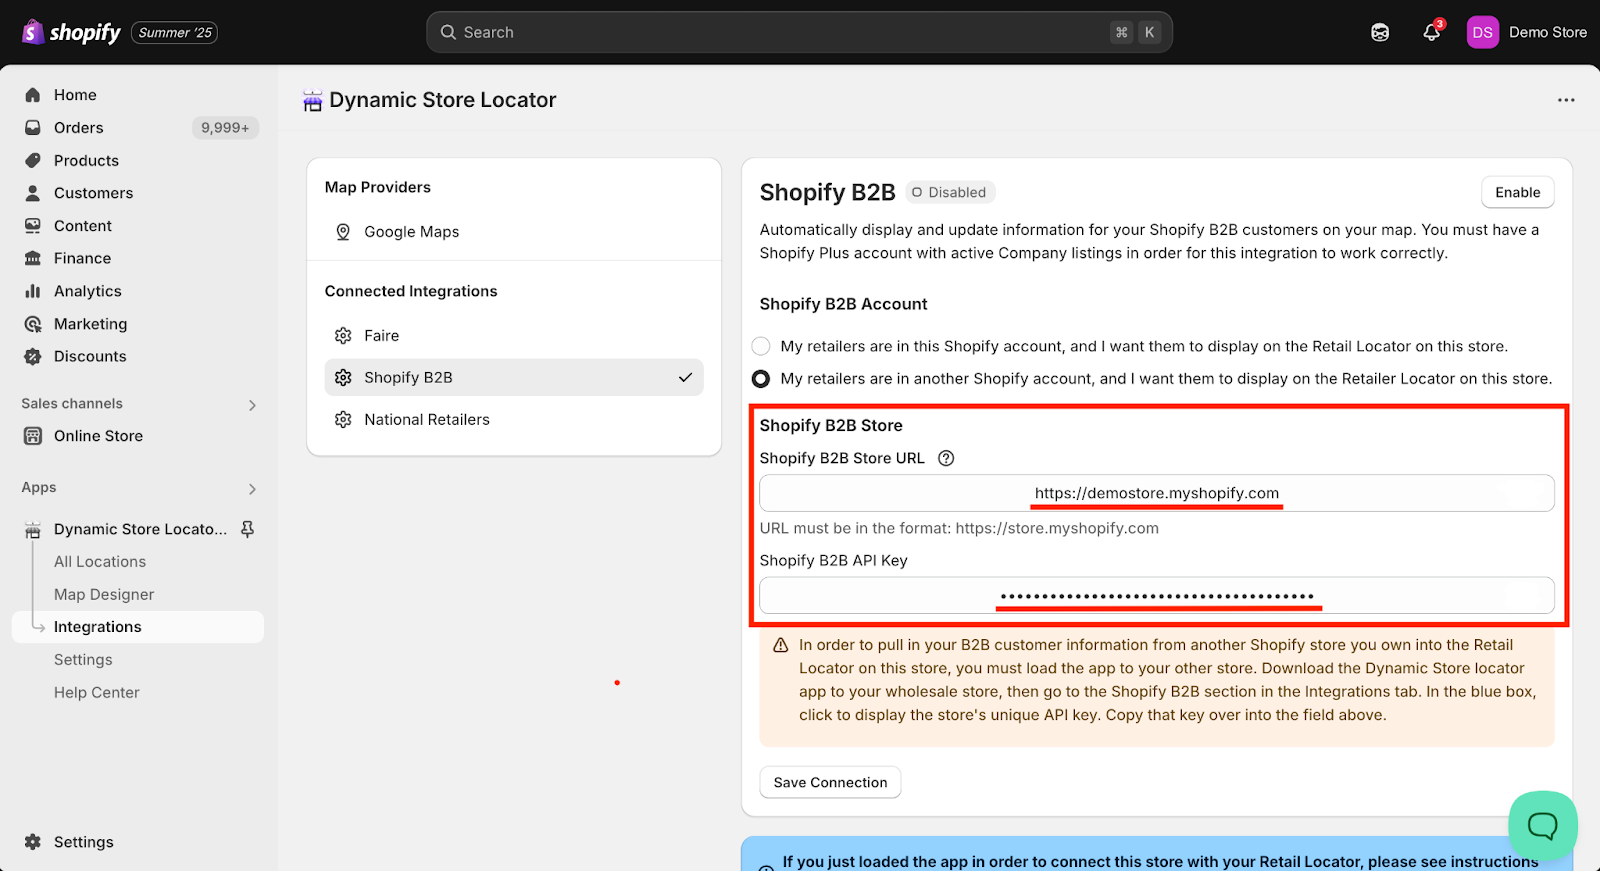
Check the box next to the option: “My retailers are in another Shopify account, and I want them to display on the Retailer Locator on this store.”
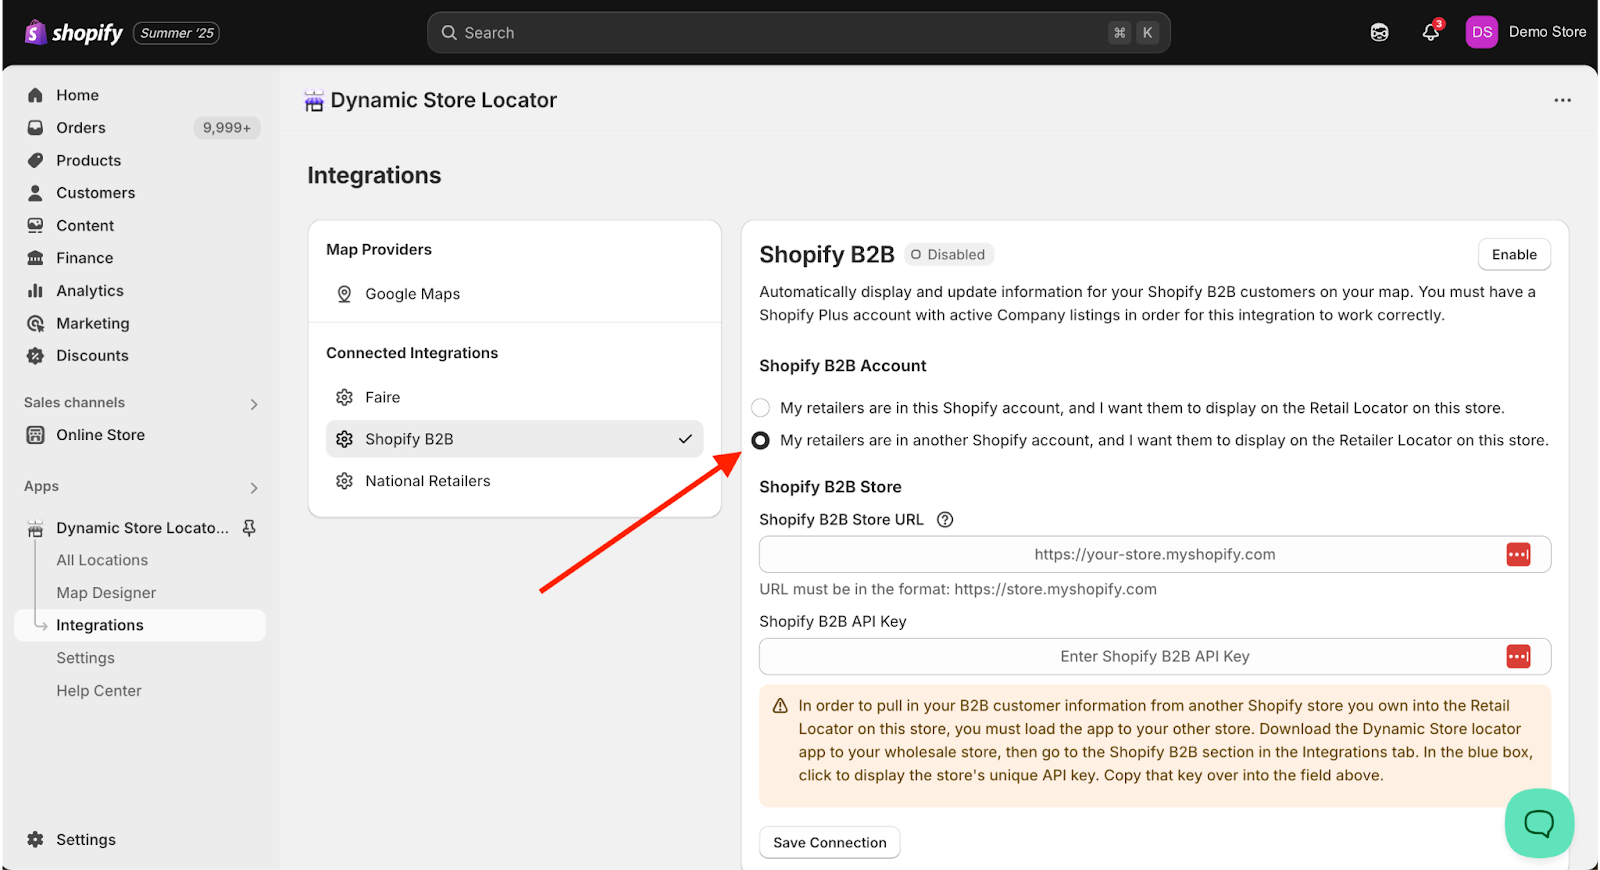
Paste the API Key you generated in your B2B store in the field labeled “Shopify B2B API Key”.
Paste your “myshopify” URL of your B2B store (the store where you generated this API Key) in the field labeled “Shopify B2B Store URL”. It should be in the format of “https://______.myshopify.com”.
Need help finding your “myshopify” URL. In the bottom left corner of your Shopify Admin in your B2B store, click “Settings” and then “Domains”. One of the URLs listed on that page should be your “https://______.myshopify.com” domain.
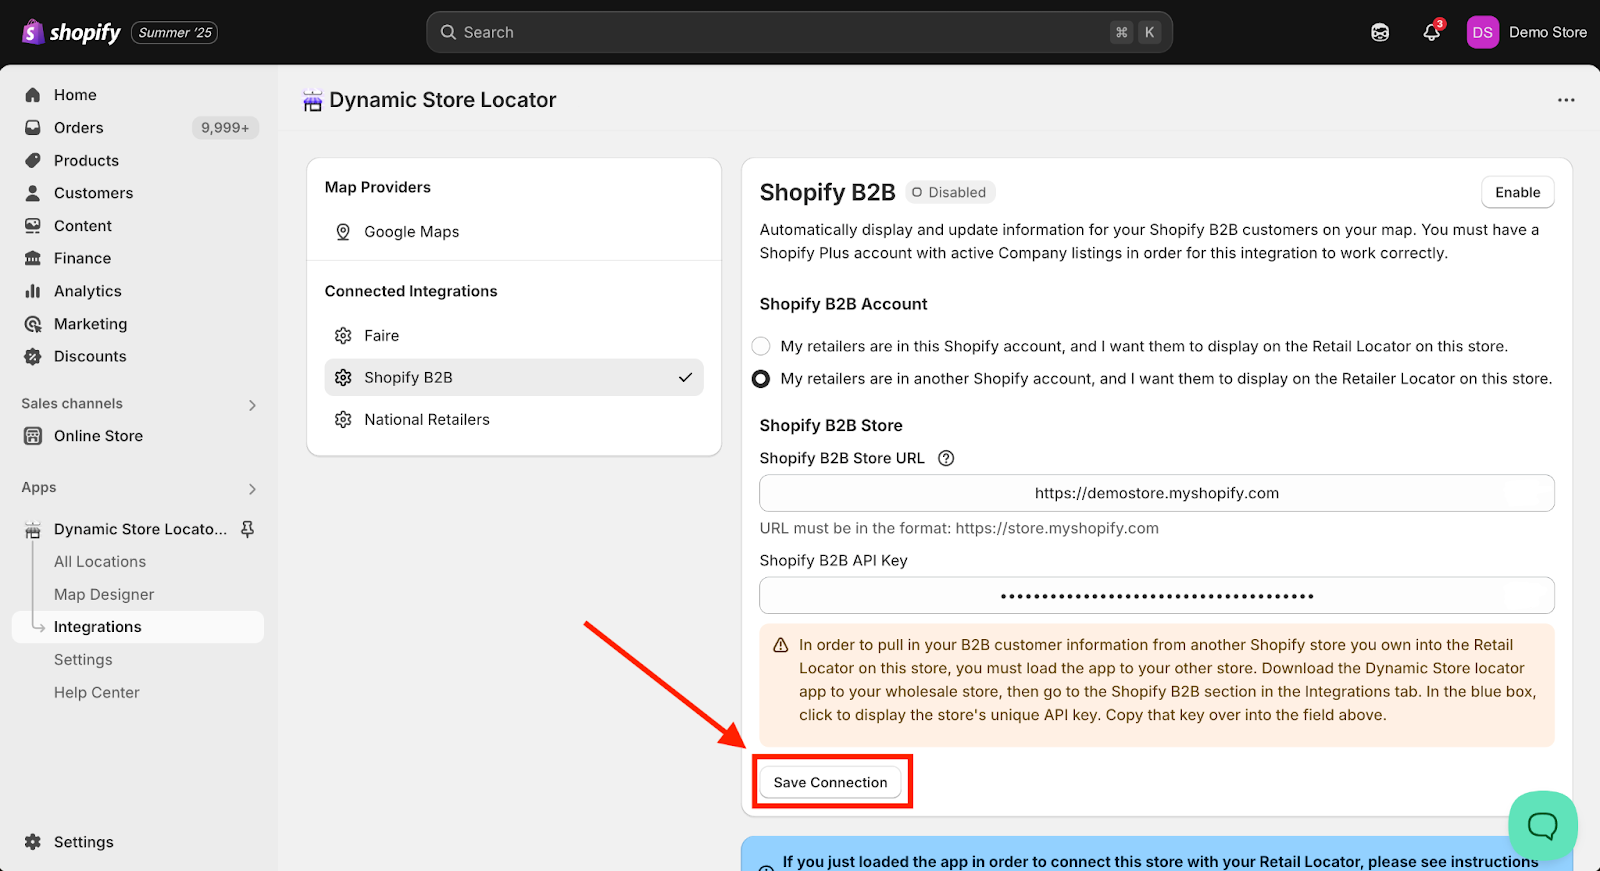
Once your Shopify B2B Store URL and API Key are loaded in those fields, click “Save Connection”.
STEP 3: Patiently Await Data Transfer
After you’ve enabled the Shopify B2B integration, the app will automatically start syncing retailers who’ve purchased from you in the past 30 days. The time it takes for the app to fully sync your Shopify B2B retailers depends on the number of retailers in the sync. Please be patient.

IMPORTANT NOTE: By default, the Dynamic Store Locator app checks each Shopify B2B retailer’s shipping address on-file against Google Business to ensure that the company has a public, open-for-business brick-and-mortar retail store with a Google Business listing. If their Google Business listing has a status of “permanently closed”, then we will exclude them from syncing. Any retailer listed as “temporarily closed” will still be pulled in. You can turn this feature OFF in the app settings if you want ALL retailers to be synced from Shopify B2B. You can always manually hide individual retailers using the eyeball icon in the locations table.
Why do we verify Shopify B2B retailer addresses against Google?
Because we understand that many purchasers on Shopify B2B may ship to a warehouse or home address that lacks a storefront, and you don’t want to point your customers to a retailer’s personal home or warehouse address.
Therefore, if one of your Shopify B2B retailers isn’t being pulled into the Dynamic Store Locator app, then it’s because the company doesn’t have an associated Google Business listing. If you believe there is an error, you may bypass this by manually adding the location. Or, you can turn this feature OFF in the settings to sync all retailers. You must initiate a Re-sync after turning this feature off.
Troubleshooting
I’m not seeing any locations sync even though I have Company listings.
During the initial sync, the app only syncs company listings with orders in the last 30 days. If a company has not placed an order in the last 30 days, or has never placed an order, they will not be synced. Additionally, if the company does not have an active Google Business profile that our system was able to match using name, shipping city and state, the listing will not sync. You may turn the Google Business verification feature OFF in the settings, then click the Re-Sync button to sync all customers with orders in the last 30 days.
I received an error message when trying to save the connection.
Make sure you are using your ‘myshopify’ store URL - not your primary domain. It must be in the format of “https://______.myshopify.com”. To find your “myshopify” URL, go to the bottom left corner of your Shopify Admin in your B2B store, click “Settings” and then “Domains”. One of the URLs listed on that page should be your “https://______.myshopify.com” domain.
View Shopify B2B Retailers in All Locations Tab
Once you’ve given the app ample time to propagate all of your Shopify B2B retailers, you can verify and edit any details about these retailers that the app has synced.
To view your Shopify B2B retailer locations in the app, from the app menu click on “All Locations” which will bring up the database of all the locations listings. Above the listings, click “Add filter +”, then select “Source”, and finally select “Shopify B2B”.
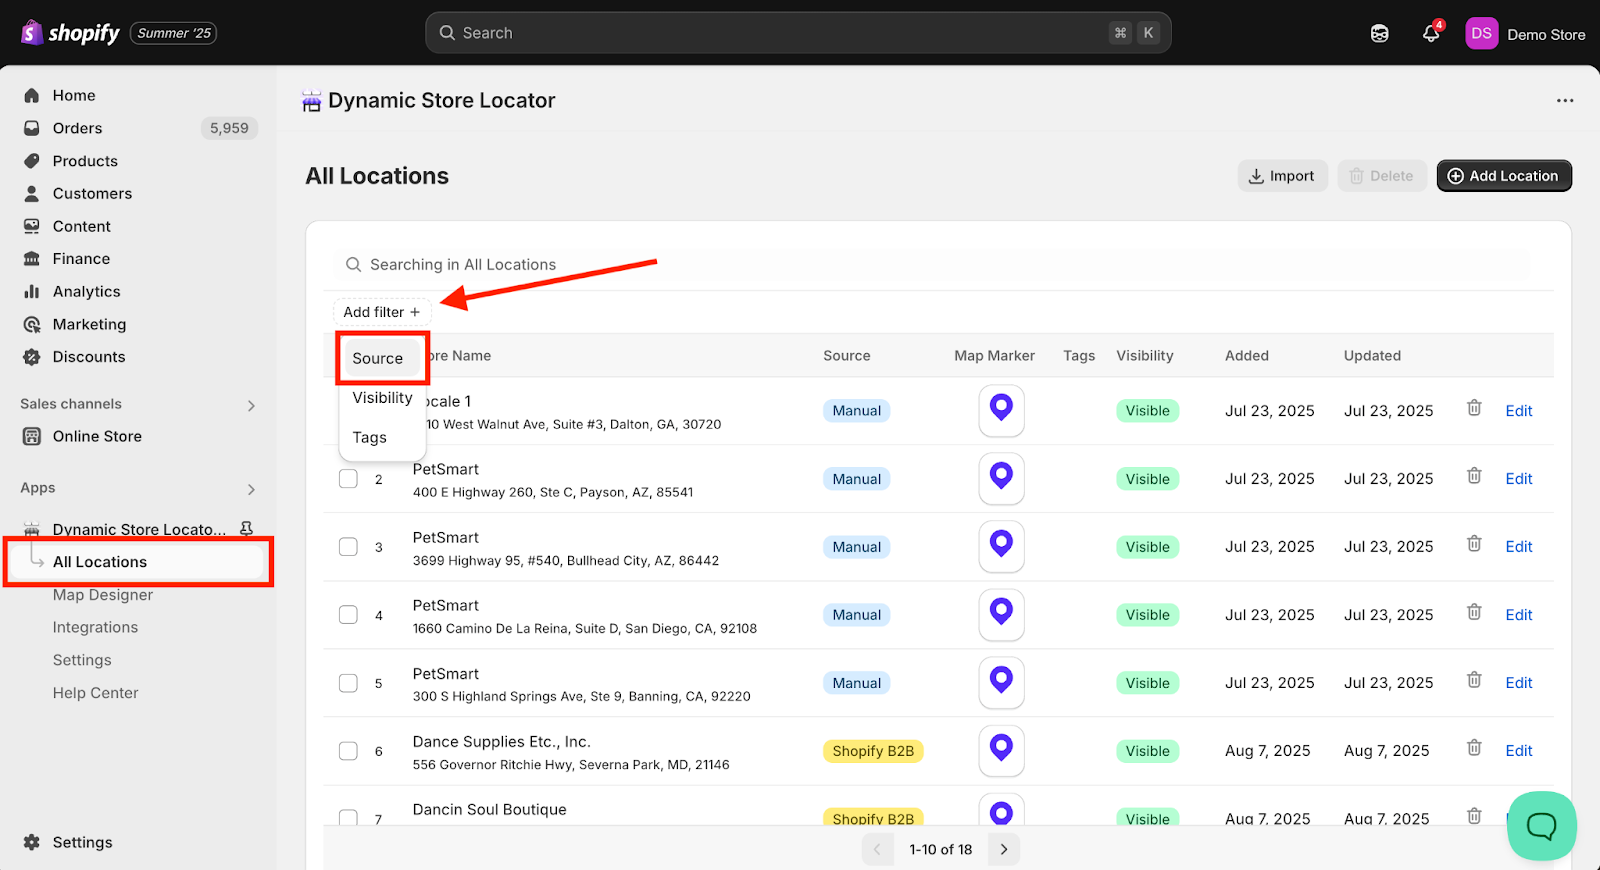

This will filter the database view to show your Shopify B2B retailers. To edit the details of a listing, you can click the address of any retailer or the ‘Edit’ button on the right side.
Updating the Sync Settings & Resyncing
By default, during the initial app integration it will sync Shopify retailer data from the past 30 days. Additionally, the app will continue to automatically sync new Shopify B2B retailers who have placed orders by running an automatic re-sync every 24 hours, as long as you select "Sync Automatically" in the sync settings.
If you want to sync Shopify B2B retailers that have purchased from you further than 30 days ago, you have the option to either pull data from 30, 60, or 90 days ago.
Important Note: On the initial integration, we are only pulling over the last 30 days of Shopify B2B data. Due to Shopify API limitations, we can only pull over 3 months (90 days) worth of order data. Once a retailer is added, though, they won’t go away (unless you disable the integration).
To Update the Sync Settings:
In the Dynamic Store Locator app, from the app’s menu panel on the left side, click on the “Integrations” tab. Then, click on “Shopify B2B” under “Connected Integrations”. This will open the Shopify B2B integration, and if you followed the steps above then you should see a green “Enabled” tag next to the Shopify B2B title.
If "Sync Automatically" is selected, when a retailer places a B2B order they will be automatically added to your store locator, as long as they have a matching live Google Business profile unless that feature is turned off. New retailers will be synced with all available information from their Google Business Listing. Existing retailers with data already populated in the app will not be overwritten with new data during the sync.
To sync Shopify B2B retailers from further than 30 days ago, click "Sync Manually" and simply select any of the three options: The last 30 days, The last 60 days, or The last 90 days.
After you selected your desired date range, click the “Re-sync Shopify B2B” button.
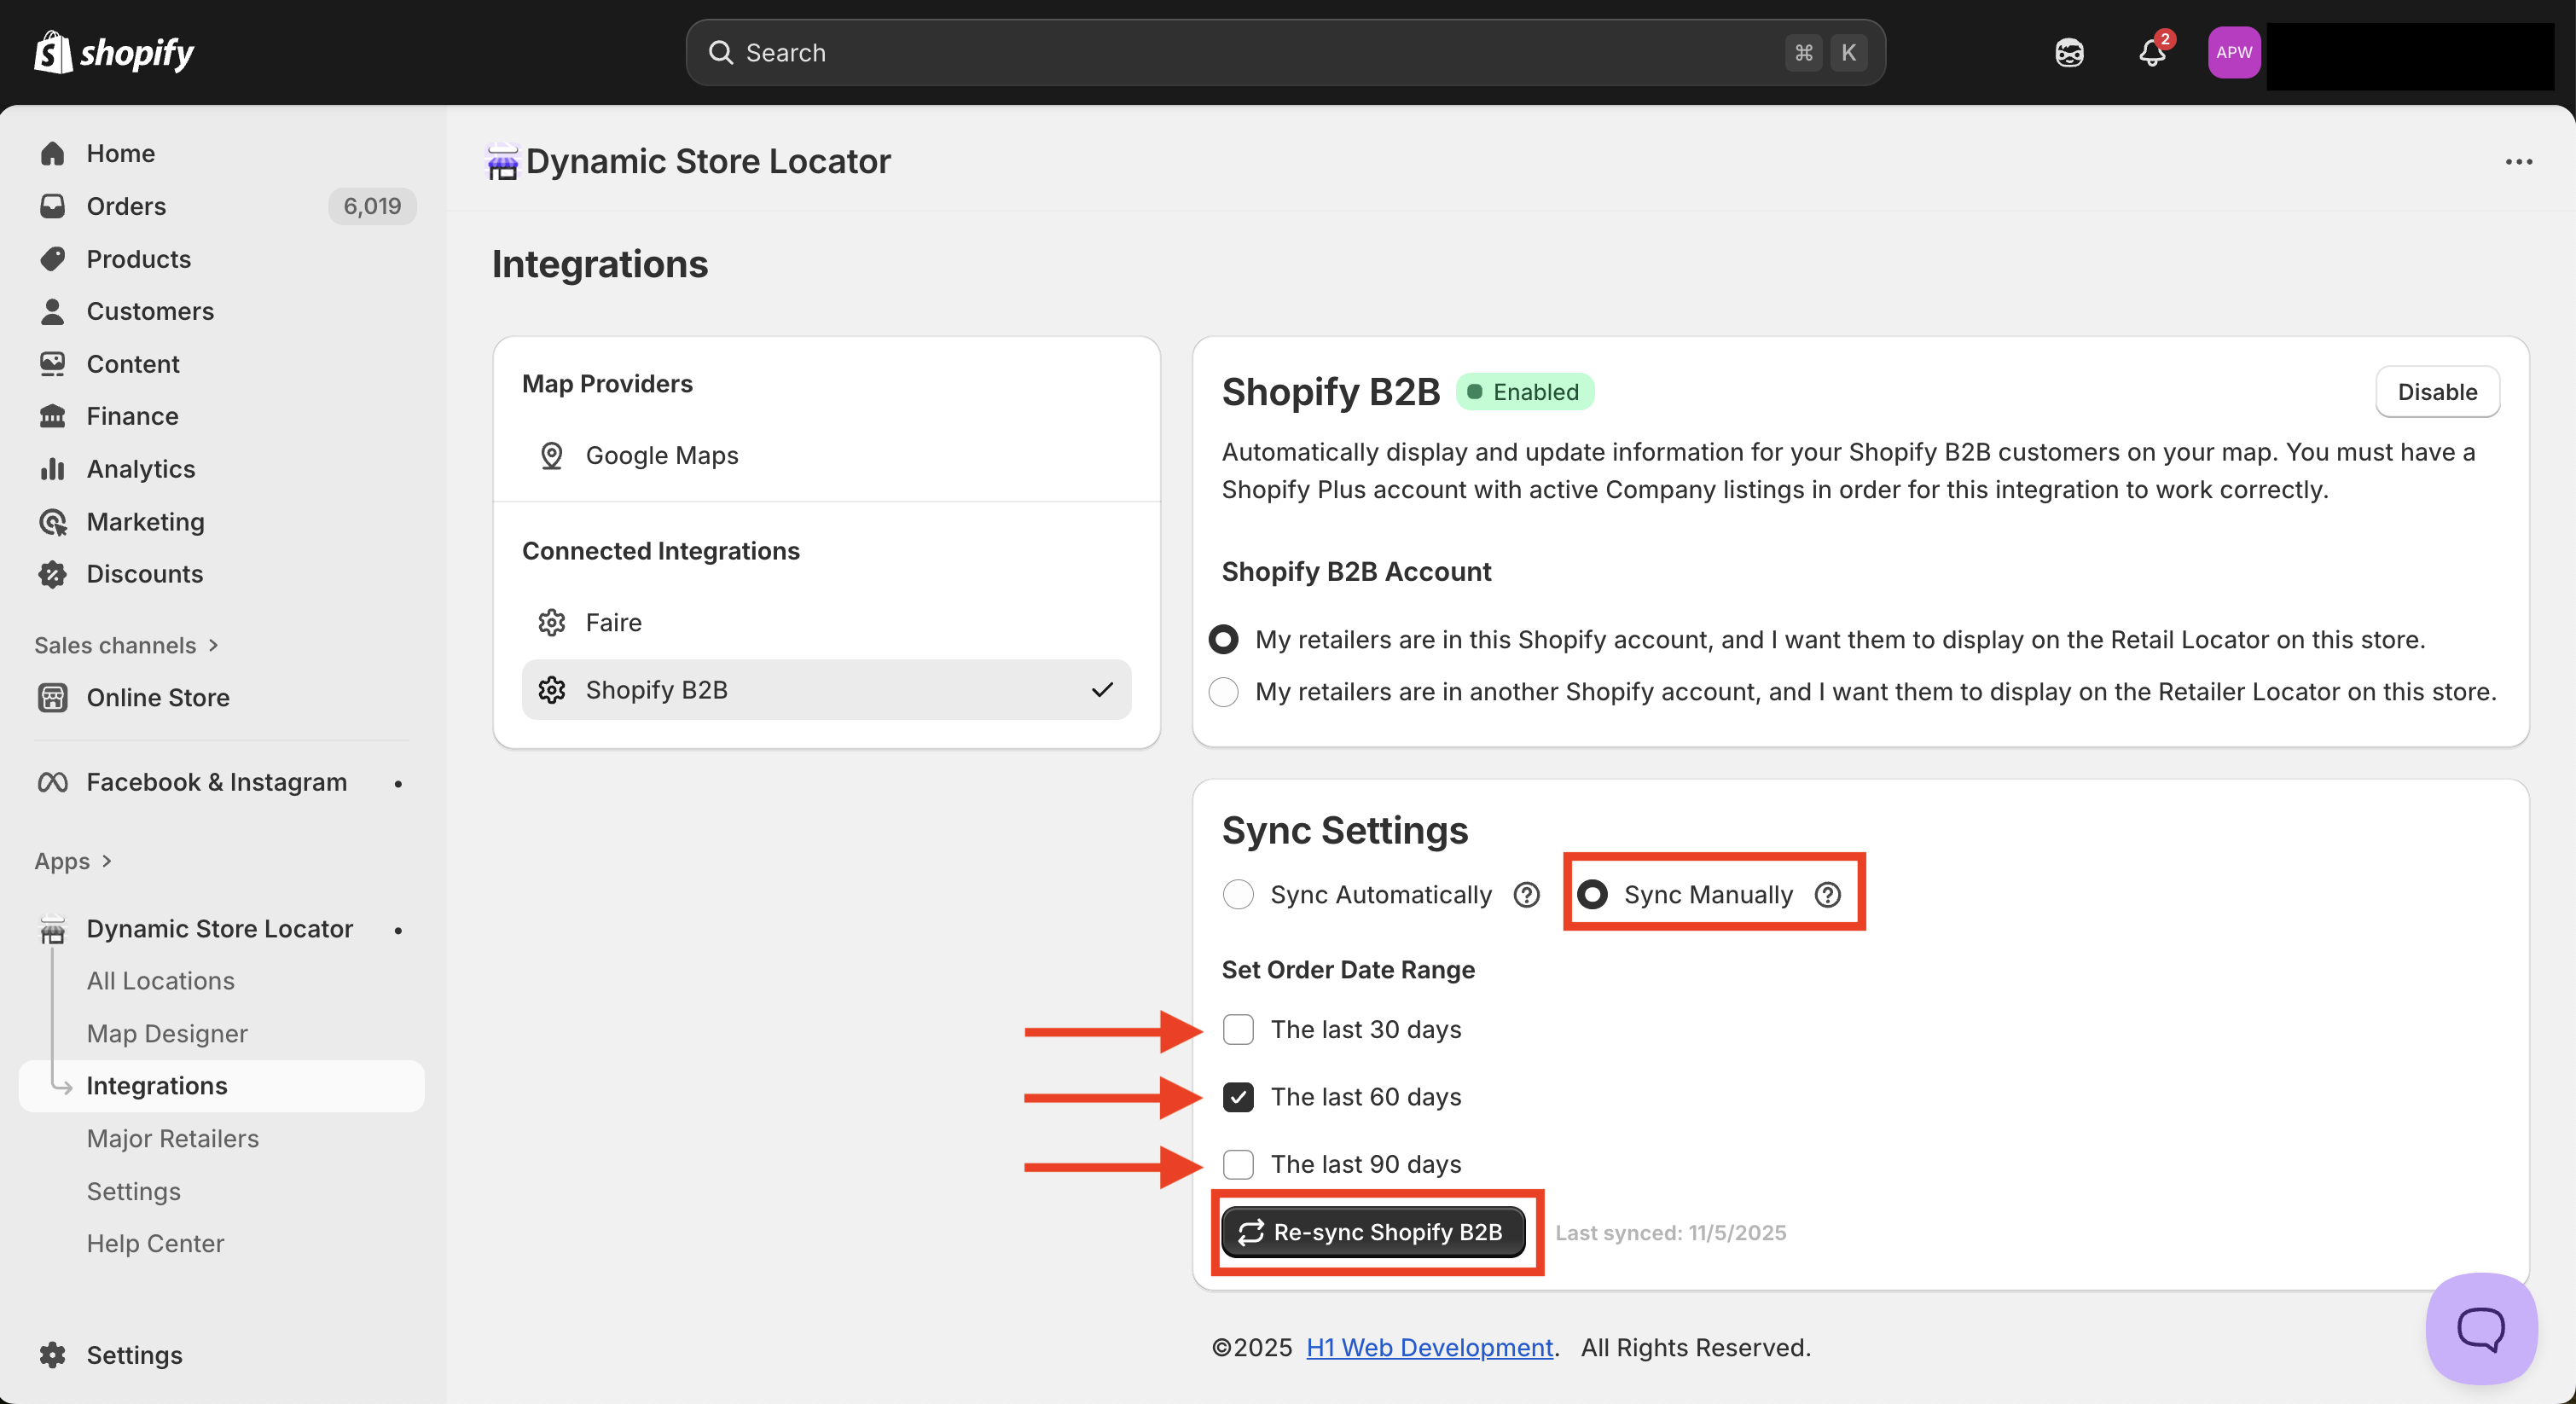
The time it takes for the app to fully sync your Shopify B2B retailers depends on the number of retailers in the sync. Please be patient.
After a day, we recommend that you switch the setting back to "Sync Automatically" so that continuous data re-syncs will occur in the future.
See the above section “View Shopify B2B Retailers in All Locations Tab” to verify and edit the new Shopify B2B locations added via the Re-sync.
Auto-Hide Inactive Retailers
By default, the app will be set to Auto-Hide Inactive Retailers. This will ensure that any retailer that hasn't placed an order through Shopify B2B in the last six months will be automatically hidden from your map. If you want to turn this feature OFF, then you must update the setting to 'Manually set location visibility'. Retailers are never deleted - only hidden from your map after 6 months of inactivity. You can go in and unhide any retailer that the app hides automatically if necessary. This feature only works if Sync Settings are set to AUTOMATIC. If set to manual sync, this feature will not work.

Business Verification
By default, the Dynamic Store Locator app checks each Shopify B2B retailer’s shipping address on-file against Google Business to ensure that the company has a public, open-for-business brick-and-mortar retail store with a Google Business listing. If their Google Business listing has a status of “permanently closed”, then we will exclude them from syncing. Any retailer listed as “temporarily closed” will still be pulled in.
You can turn this feature OFF in the app settings if you want ALL retailers to be synced from Shopify B2B. You can always manually hide individual retailers using the eyeball icon in the locations table. You must initiate a re-sync after turning this feature on or off.
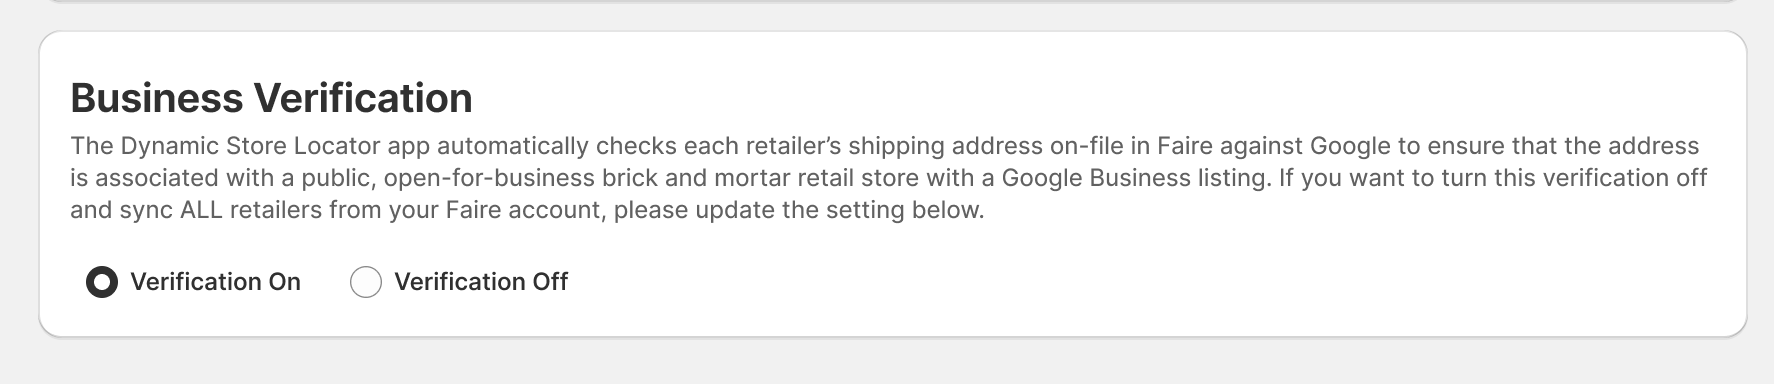
Why do we verify Shopify B2B retailer addresses against Google?
Because we understand that many purchasers on Shopify B2B may ship to a warehouse or home address that lacks a storefront, and you don’t want to point your customers to a retailer’s personal home or warehouse address.
Therefore, if one of your Shopify B2B retailers isn’t being pulled into the Dynamic Store Locator app, then it’s because the company doesn’t have an associated Google Business listing. If you believe there is an error, you may bypass this by manually adding the location. Or, you can turn this feature OFF in the settings to sync all retailers. You must initiate a Re-sync after turning this feature off.
We are happy to help!
We offer FREE white glove installation assistance to all customers. Schedule an installation meeting here.