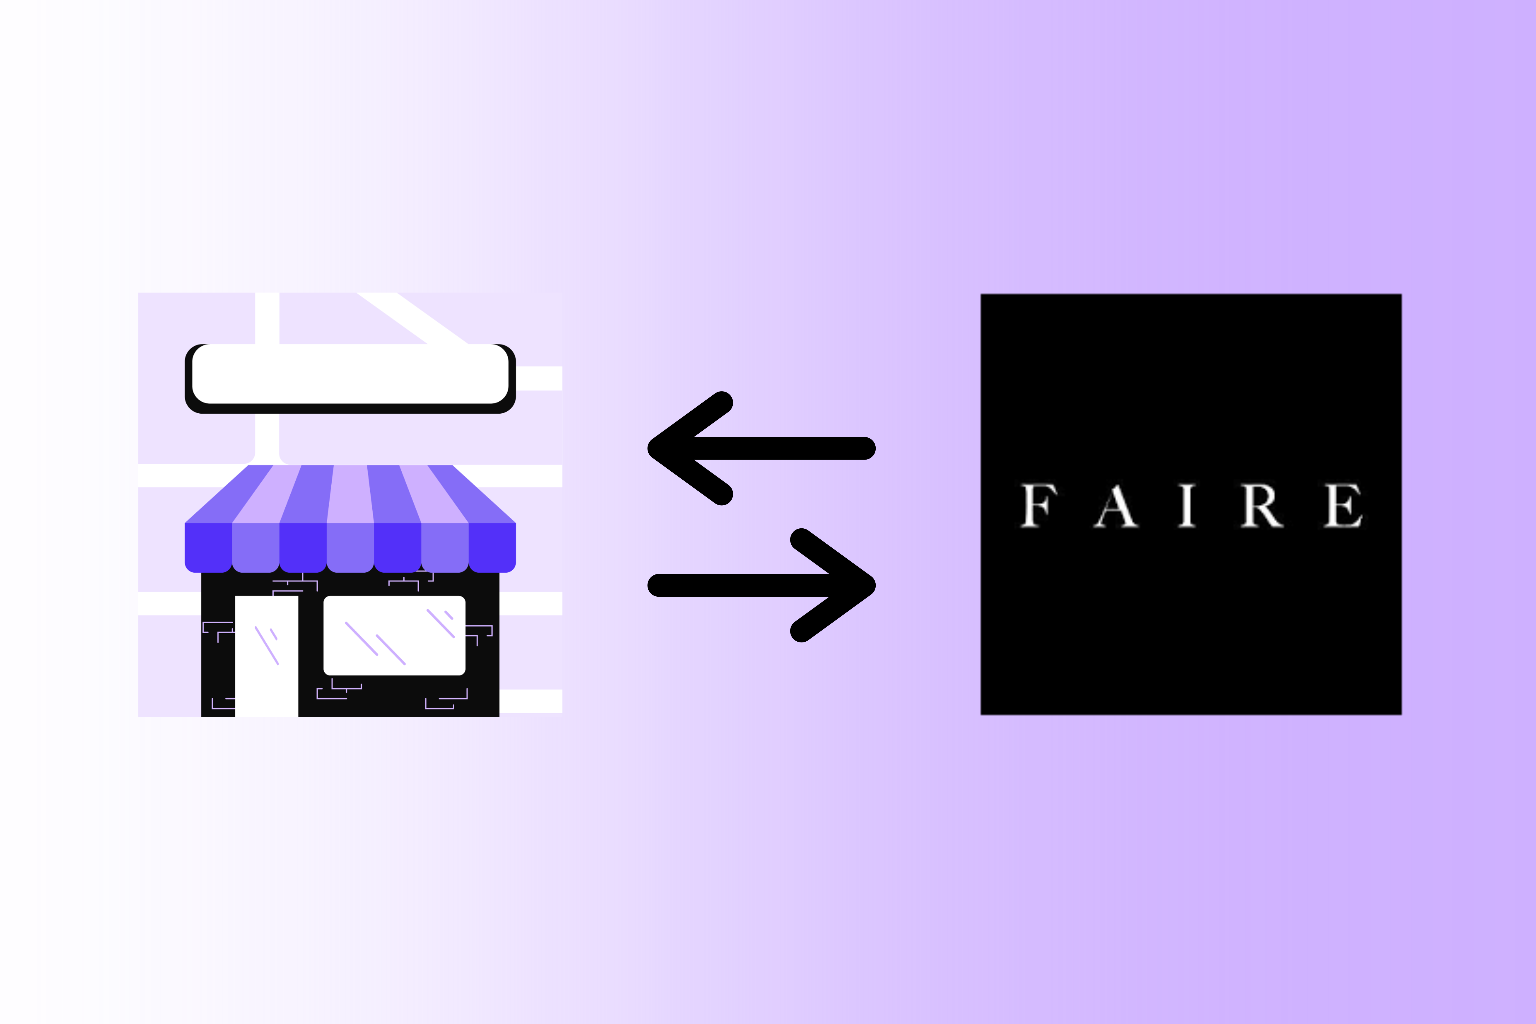
Most likely, you’ve found your way to this tutorial because you’ve chosen to use our Dynamic Store Locator app on Shopify and need a Google Maps API Key to continue the setup process. If you landed here another way, then welcome! We implore you to check out our Dynamic Store Locator app on Shopify if you run a Shopify store and want a store locations map that integrates with Shopify B2B, Faire, and major national retailers; and automatically updates when your locations change.
In this article, you’ll learn step-by-step how to generate a Google Maps API Key. Whether you have a Google Cloud account or not, our instructions will hold your hand through the entire process.
STEP 1: Create A Google Cloud Account
If you already have a Google Cloud account, and you already have billing setup and a payment method on file, then you can skip to “STEP 2: Generating Your Google Maps JavaScript API Key”. If you don’t yet have a Google Cloud account, then follow the instructions below.
First, navigate to https://cloud.google.com/. Upon arrival, Google will either recognize an email you’re logged in with or not.
If you're already logged into a Google Cloud account, then click "Console" in the upper right hand corner and go to "STEP 2" of this installation guide.

If Google doesn’t recognize that you’re logged into an email account, then your screen will look like the following screenshot. Click “Get started for free”.

Follow Google’s steps to sign in to your email account. If you don’t have a Google email account/address, you’ll need to create that before you can create a Google Cloud account. After logging in, you’ll be prompted to verify your account information and input your billing details. You can skip the next two screenshots to see the next steps.
If Google does recognize that you’re logged into an email account upon arriving on the Google Cloud homepage, then your screen may look like the following screenshot. Alternatively, you may need to click “Start free” in the upper right hand corner.
Make sure you have the correct email address selected or you can “Switch account” to login to another email. Check the box under the Terms of Service, and then click “Agree and continue”.

After agreeing to their terms, click “Start free” in the upper right hand corner.

Now, we should all be on the same page. Please verify that the correct email address is selected and click “Agree & continue”.

Next, you’ll need to input your billing details and store a credit card on file. You MUST do this in order for our app to properly generate your store locator map.
Please note: this is primarily a formality. In most cases, you will never be charged for using the Google Cloud platform. You will only begin to be charged for using the Maps API once you’ve surpassed 10,000 map views per month to the map. Later in this process, you can set up billing alerts so that you’re forewarned before being charged.

Be sure to select “Organization” when setting up your payments profile. Then, fill in the rest of your billing information.

Add an up-to-date payment method.

Once your billing details and payment information have been entered, click “Start free”.

You’ll be prompted to fill in details about your organization and use cases. There’s no need to fill in this information, as it is only for Google’s internal purposes.
Click “Close” and proceed to the next step where you’ll generate a Maps API Key.

STEP 2: Generate A Google Maps JavaScript API Key
In the upper left hand corner, click the hamburger menu (the three stacked lines).

In the dropdown, hover over “APIs & Services” and then click “Library”.

In the Maps section of the API Library, click “Maps JavaScript API”. If you don’t see it on the first page of the library, then in the Maps section, click “View all”.

Find and click on the “Maps JavaScript API” tile.

Now, click “Enable”.

Congrats! You’ve created the Maps API Key. But we’re not quite done yet. For now, you can copy that API Key and paste it somewhere (notes app, document, etc.) to keep it for later.
Please continue on to the following steps to ensure your store locator will work properly.
Click “Go to Google Maps Platform”.

If you see the following prompt box, then click “Maybe Later”.

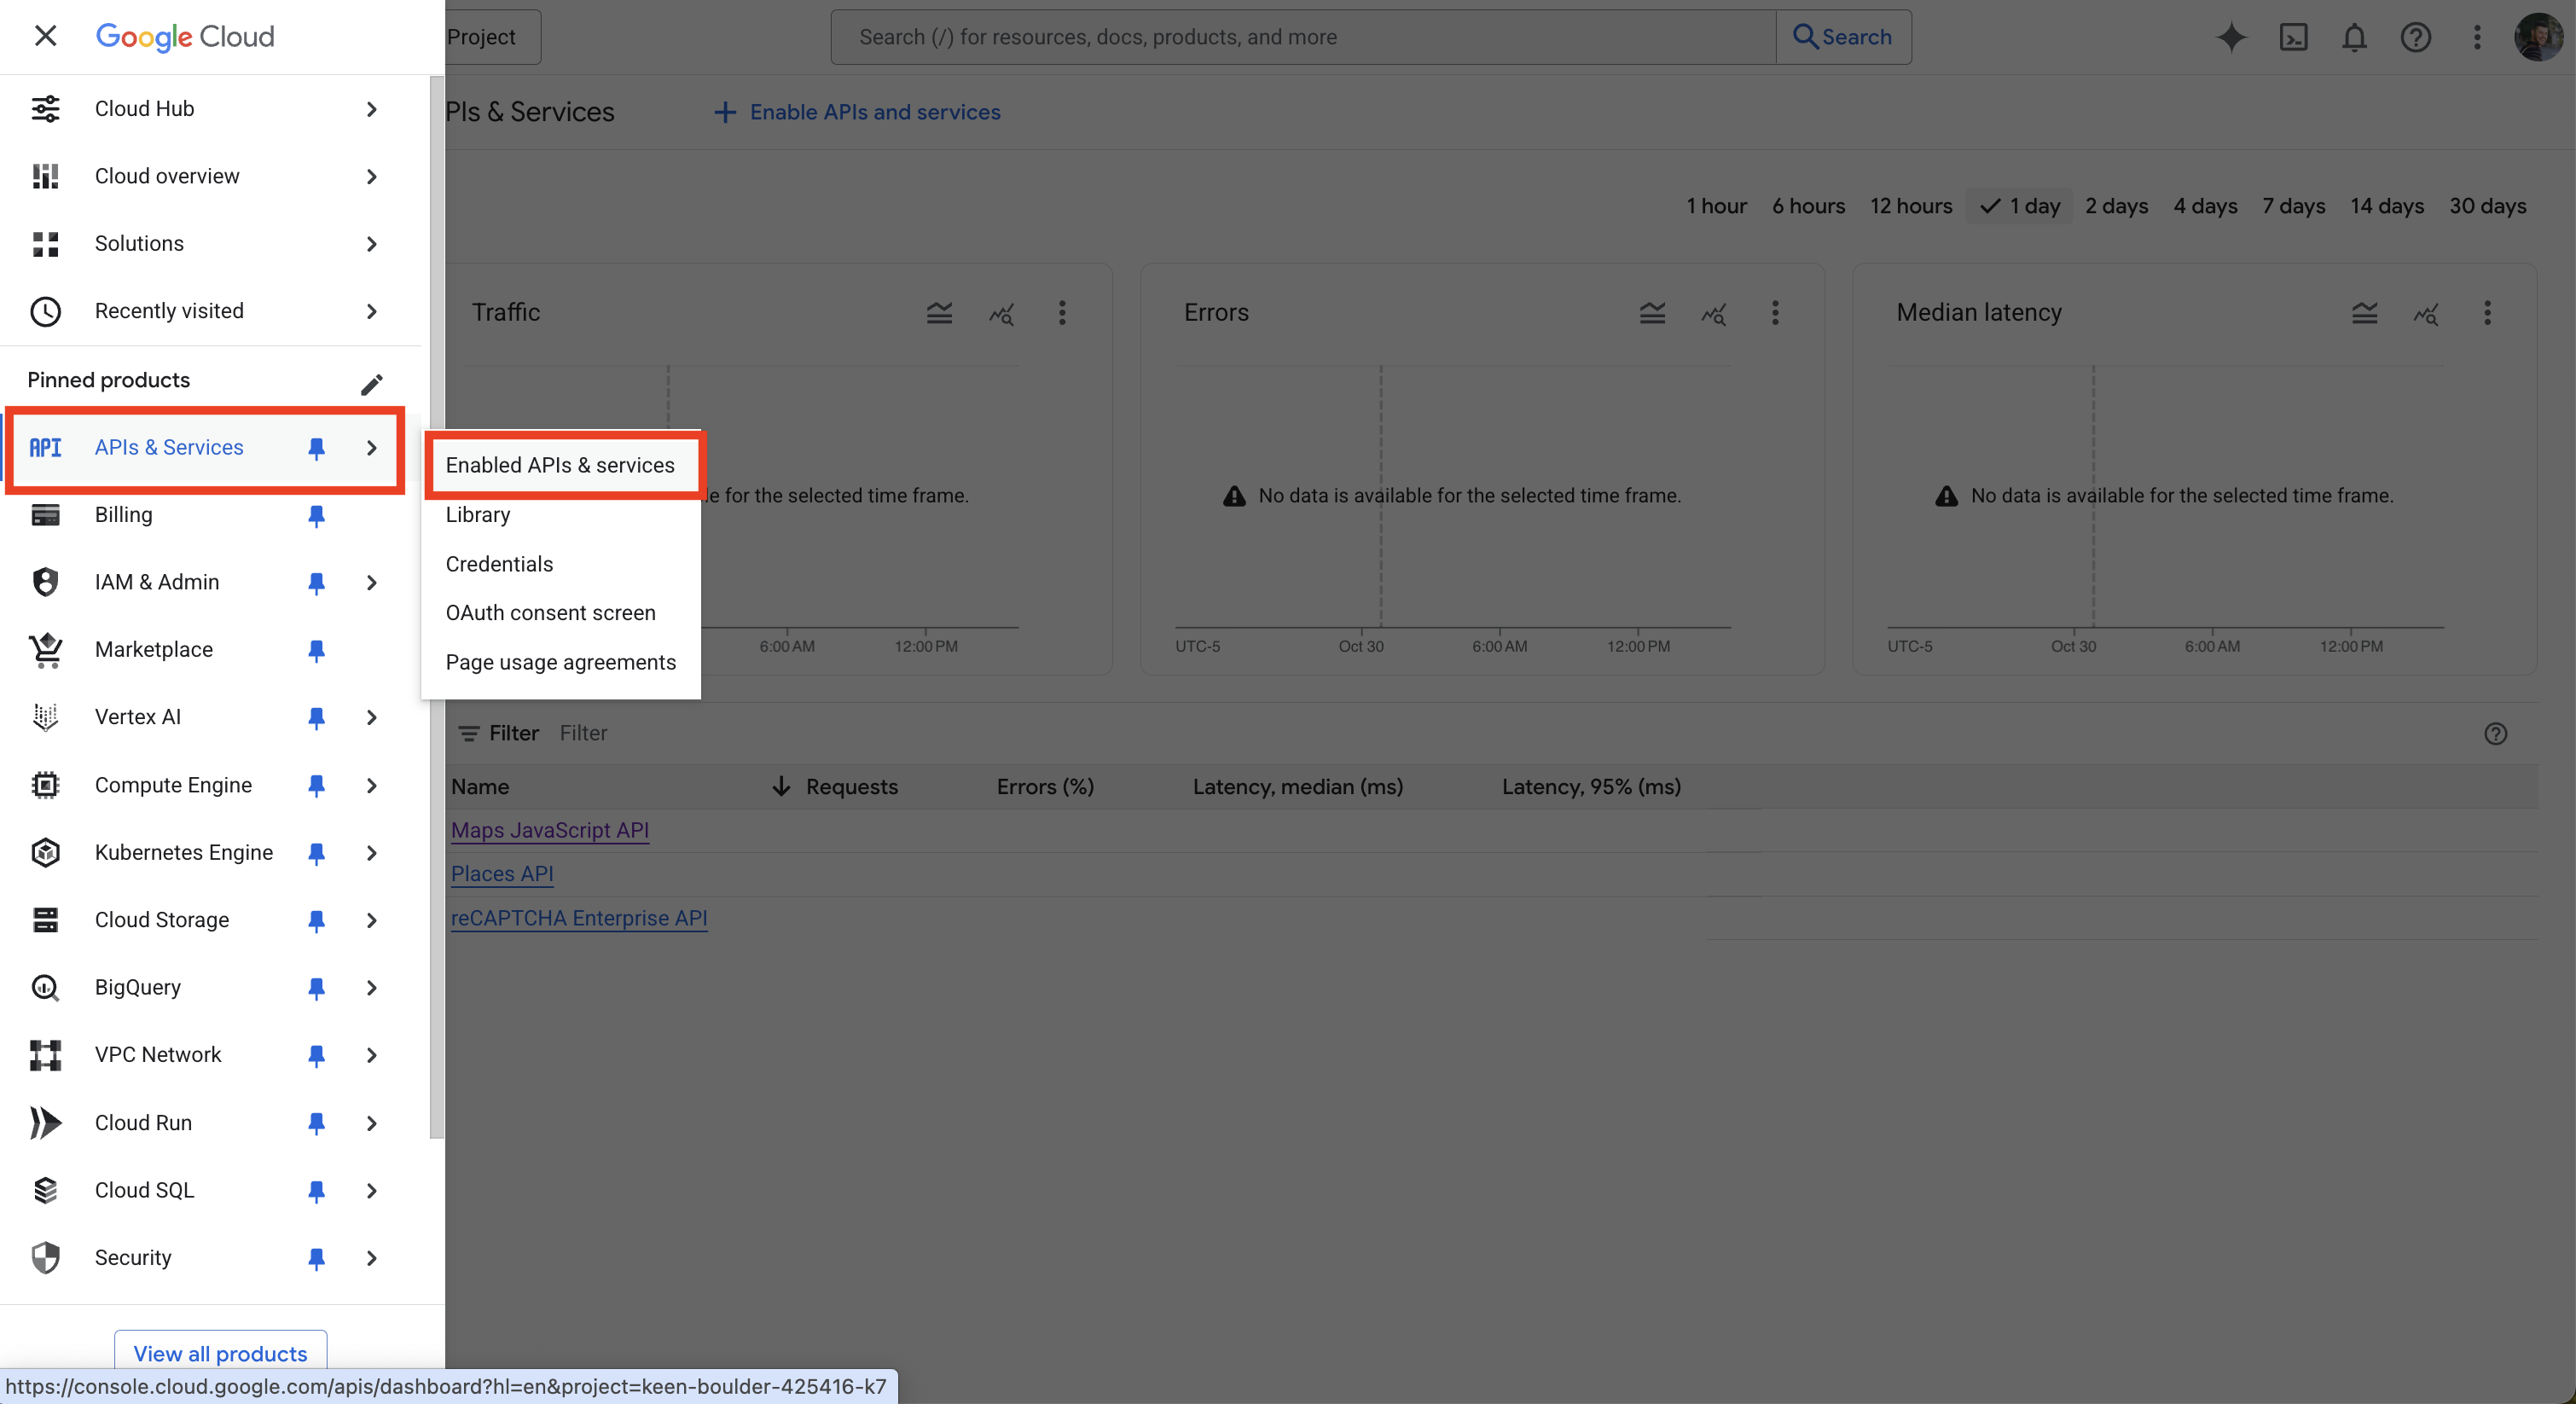
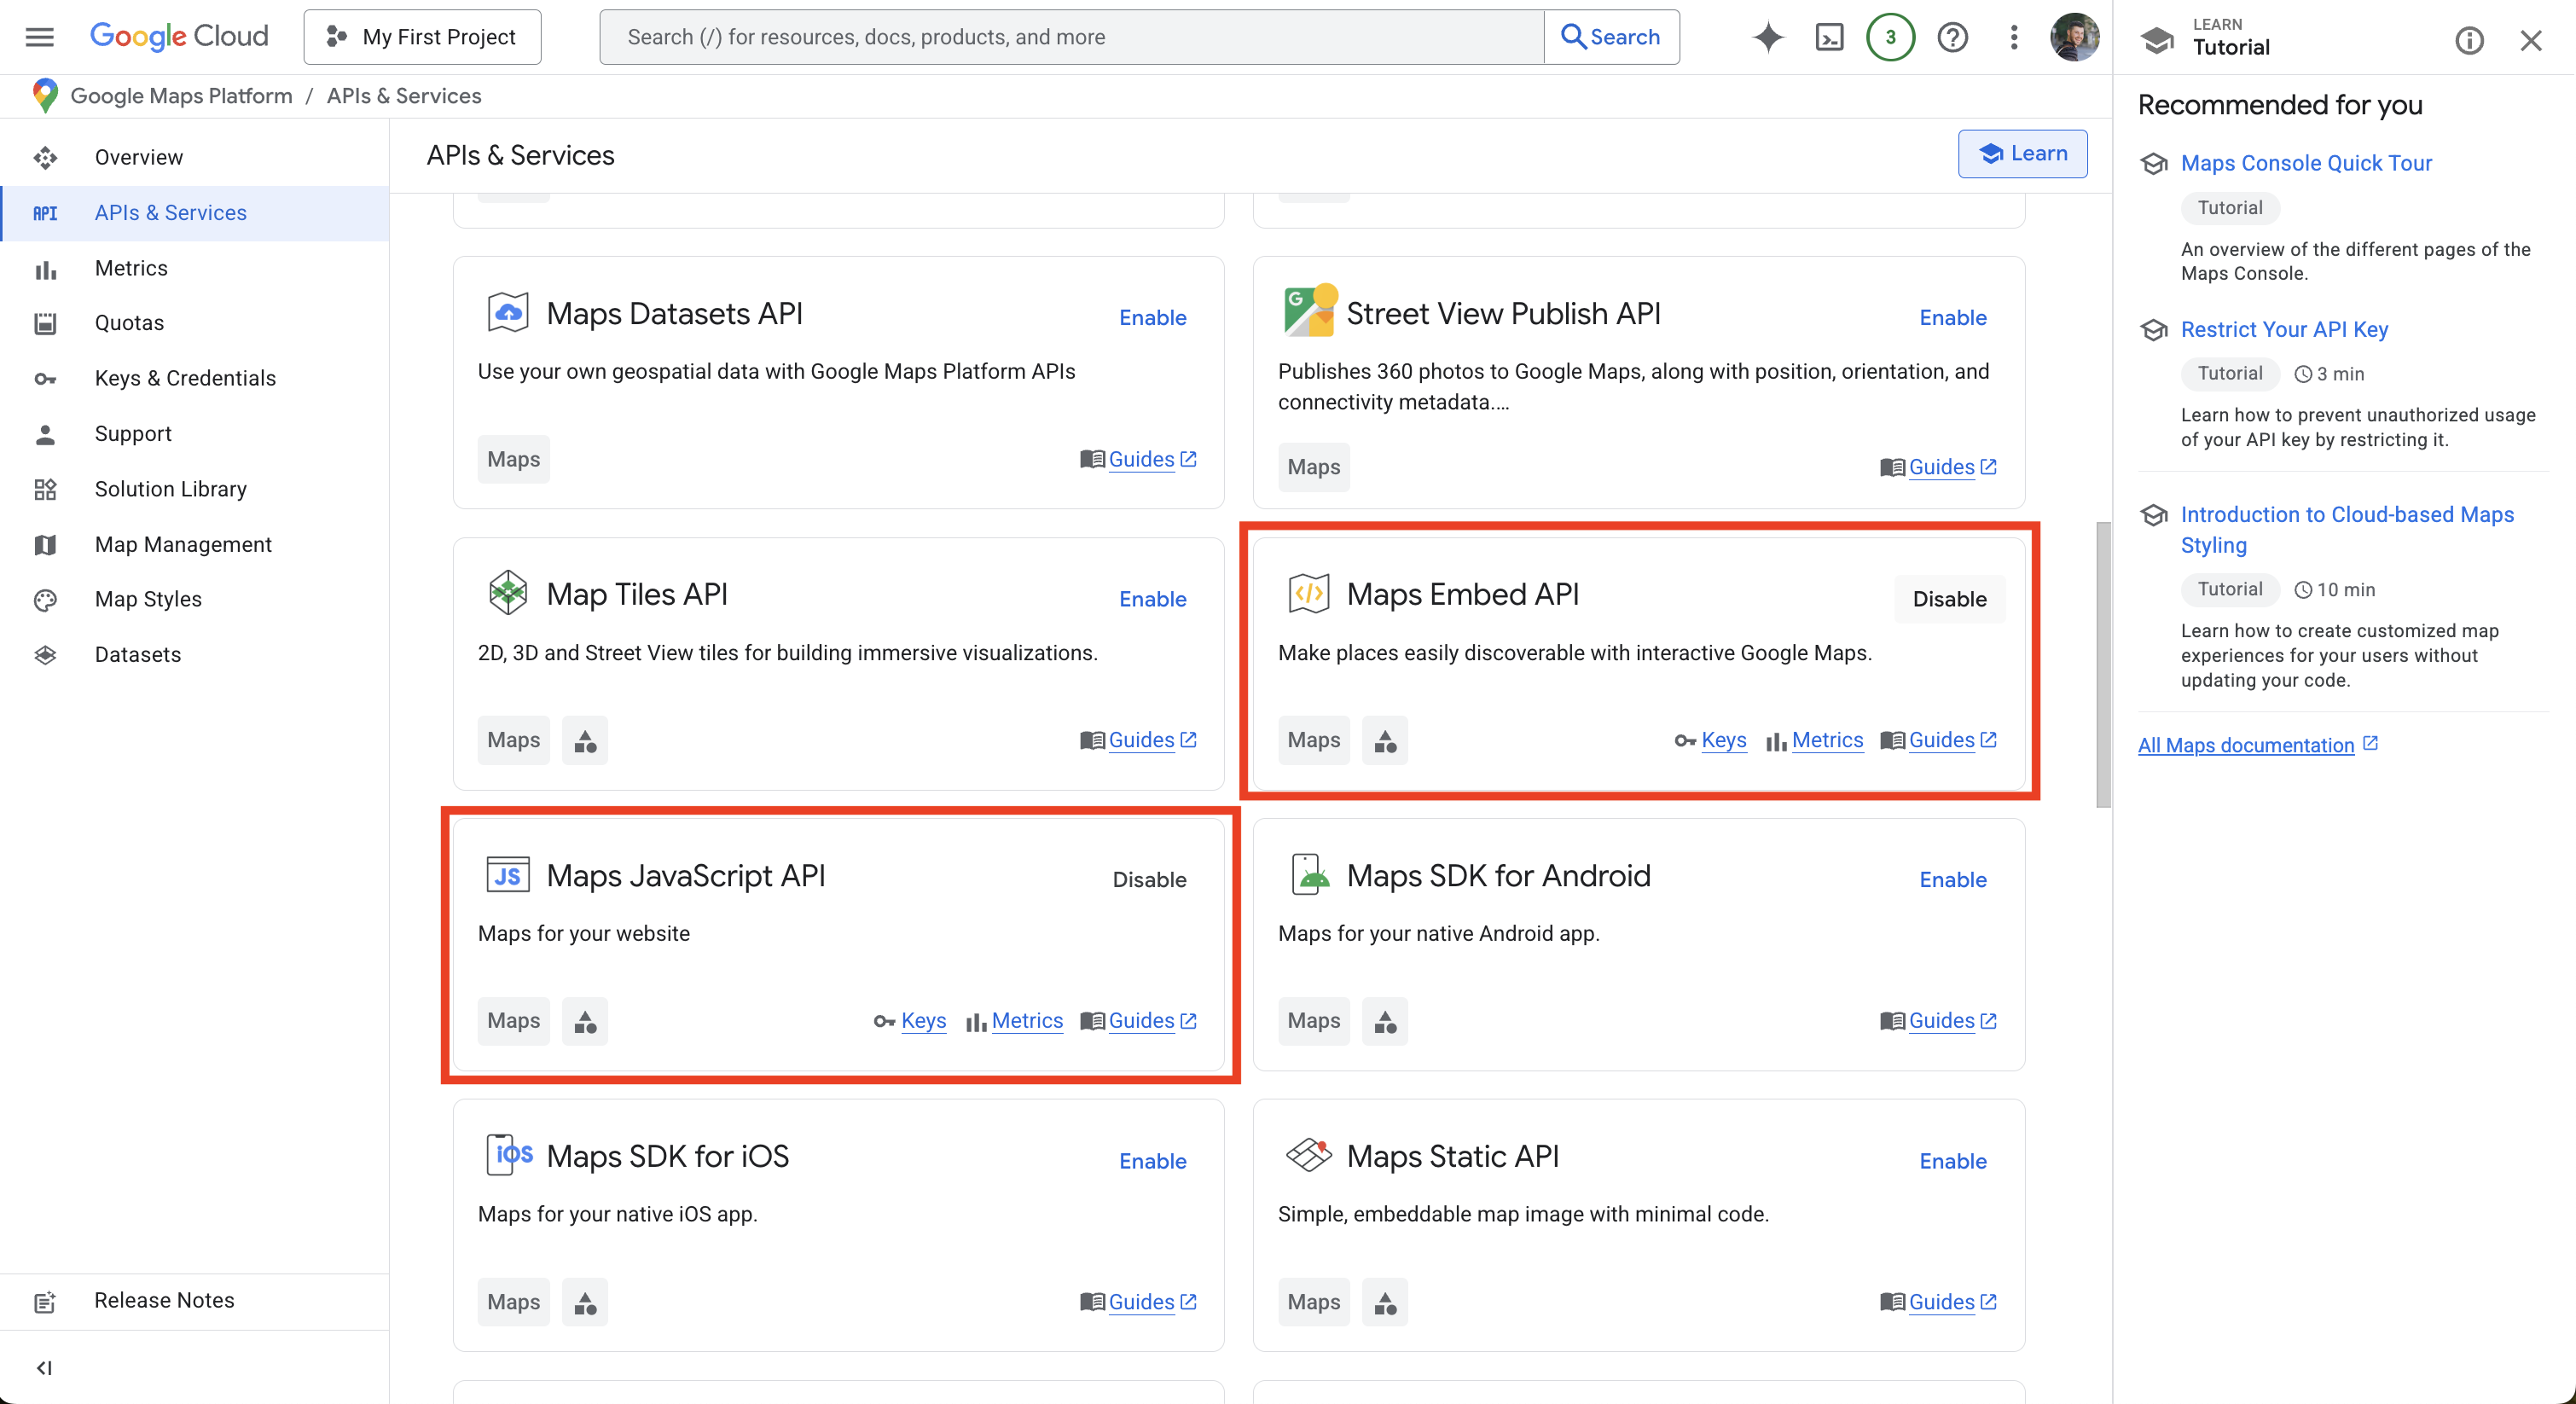
Now, we need to enable a few other APIs in your account.
Click the hamburger menu in the upper left hand corner, hover over APIs & Services and click Enabled APIs & services.
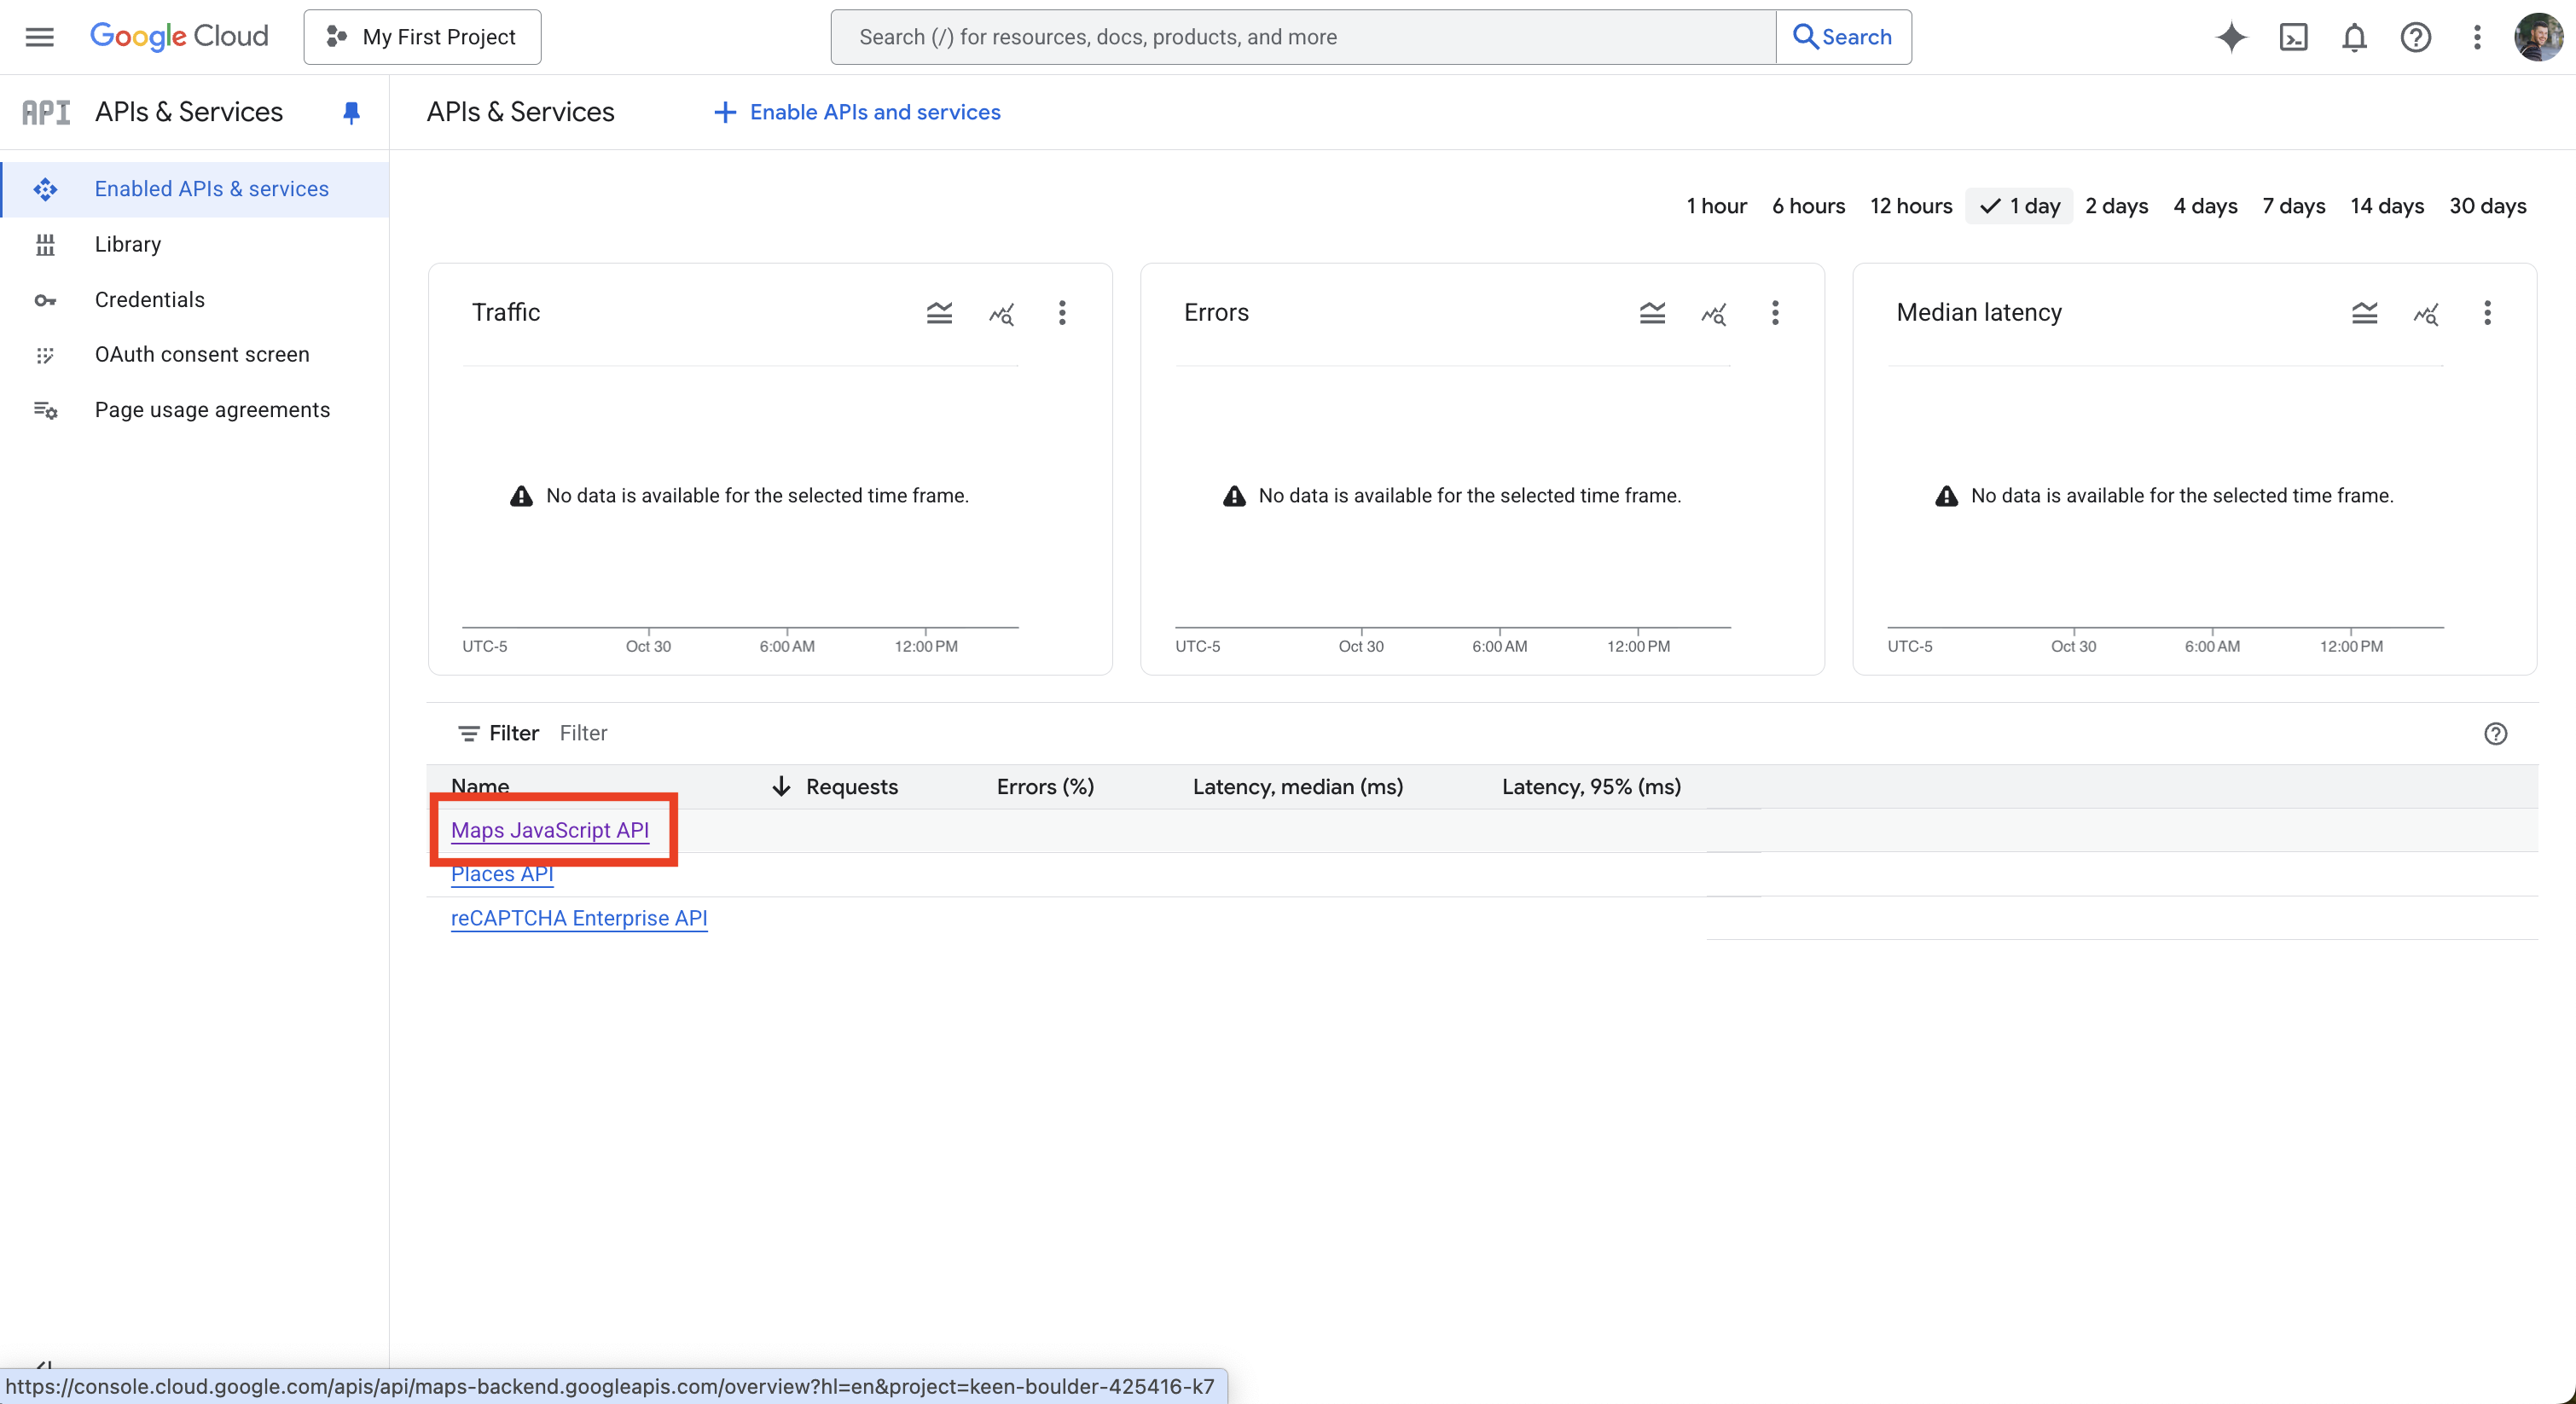
Then click on Maps JavaScript API.
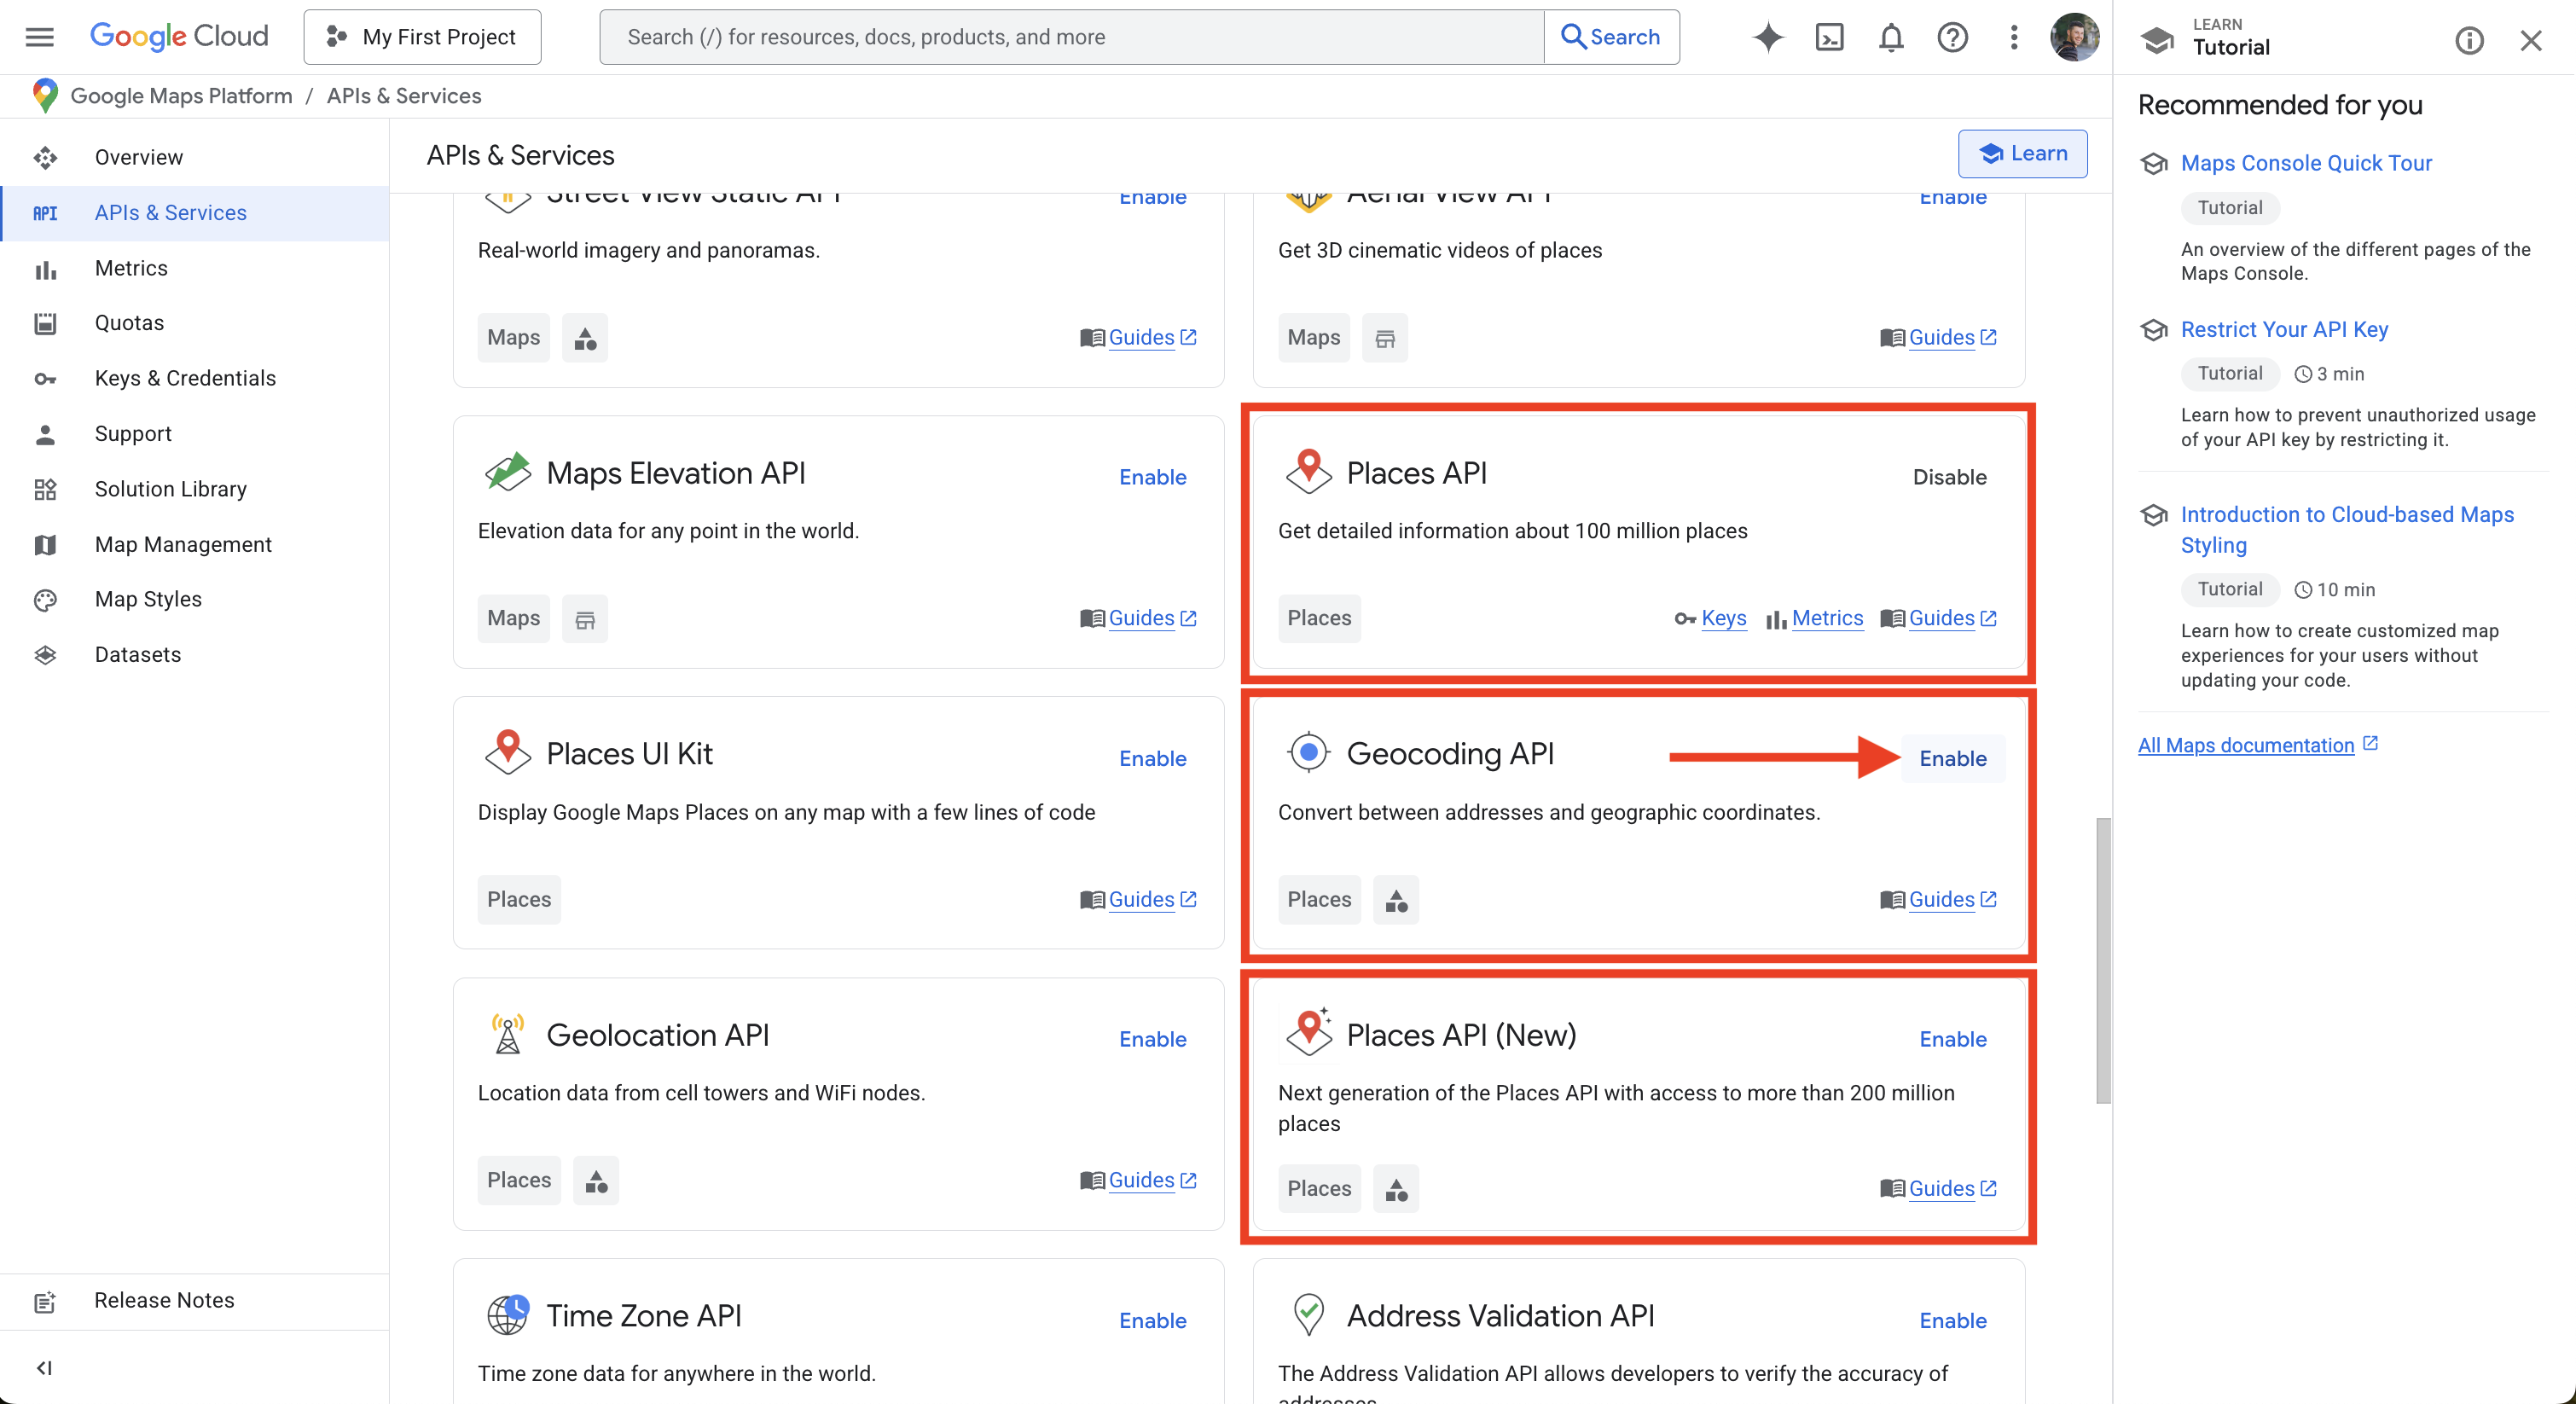
Scroll down and make sure to enable the 5 following APIs:
- Maps JavaScript API
- Places API
- Places API (New)
- Geocoding API
- Maps Embed API
Click the blue-highlighted "Enable" button next to each of the above listed APIs. If there's a grey "Disable" button, then that means the API is already enabled and you don't need to do anything for that API.
STEP 3: Restricting Your API Key
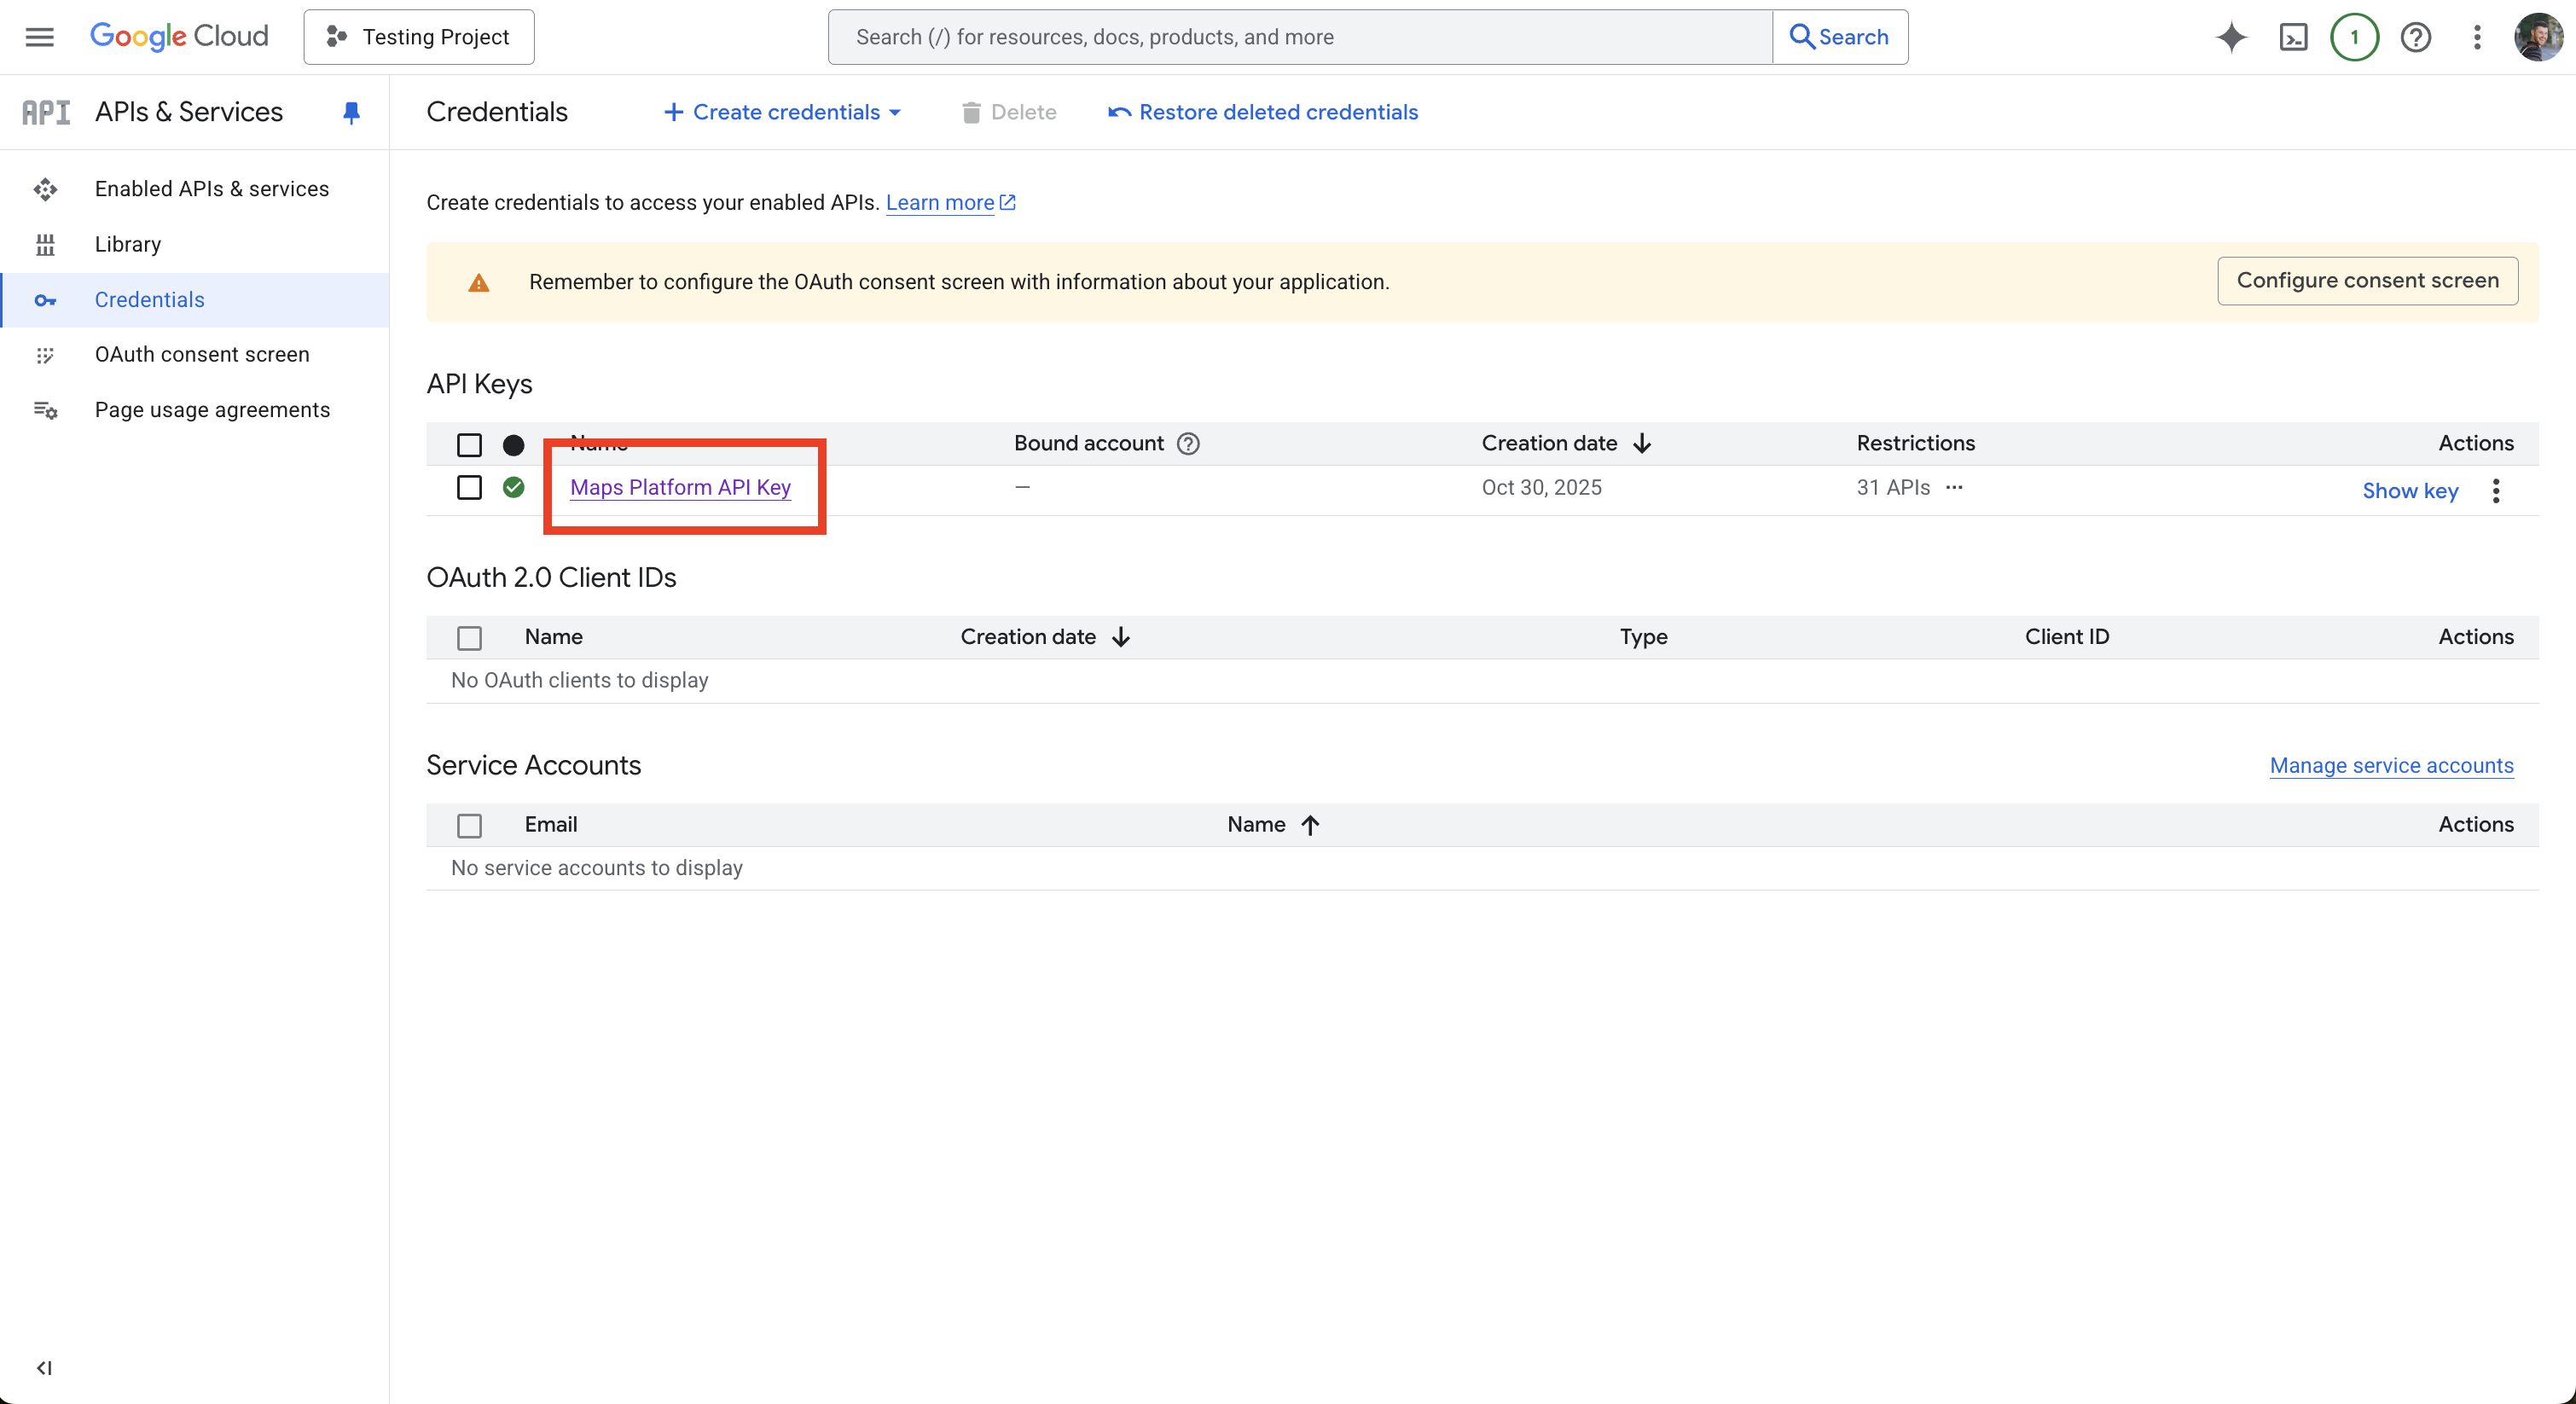
Click on the hamburger menu (the three stacked lines) in the upper left hand corner. In the dropdown, hover over “APIs & Services” and then click “Credentials”.

On the Credentials screen click on “Maps Platform API Key”.
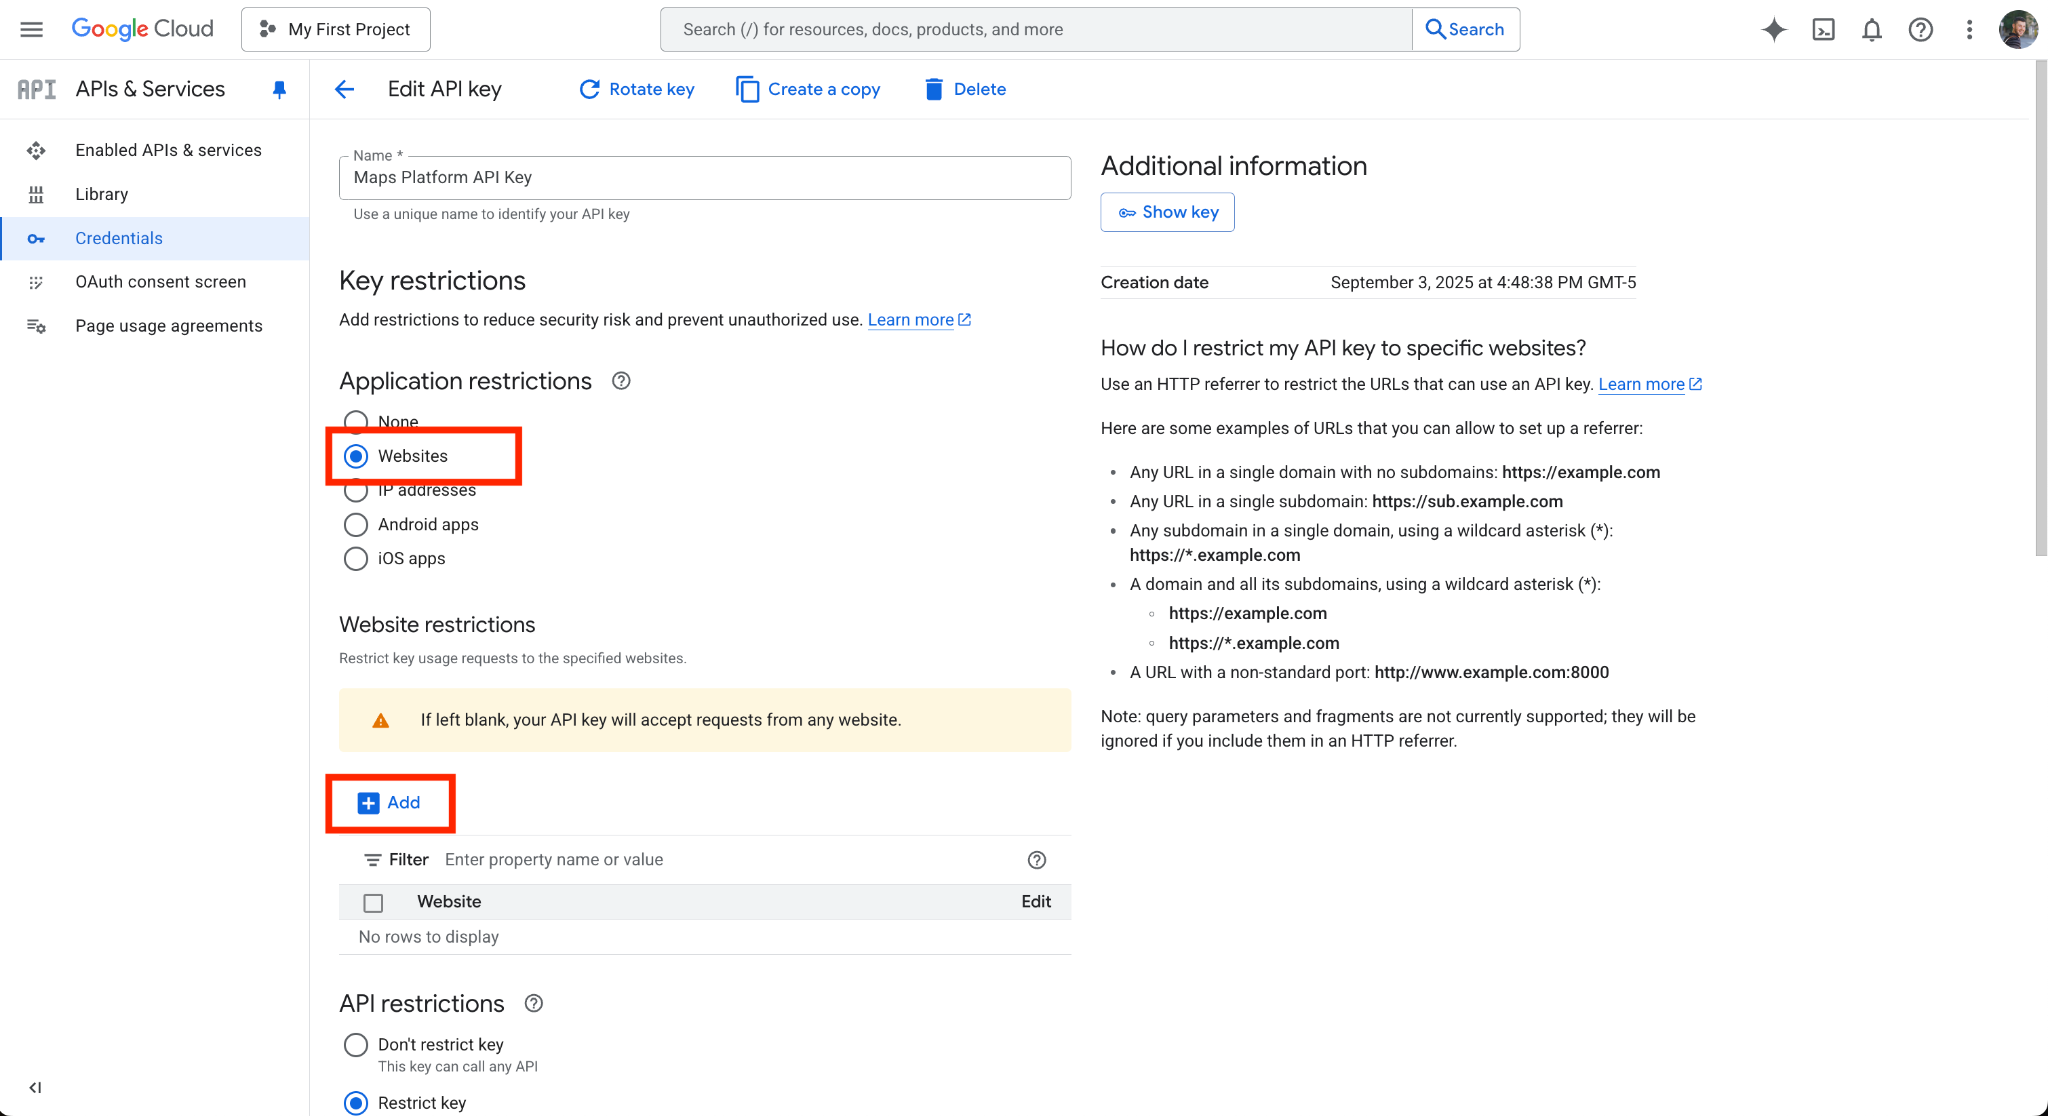
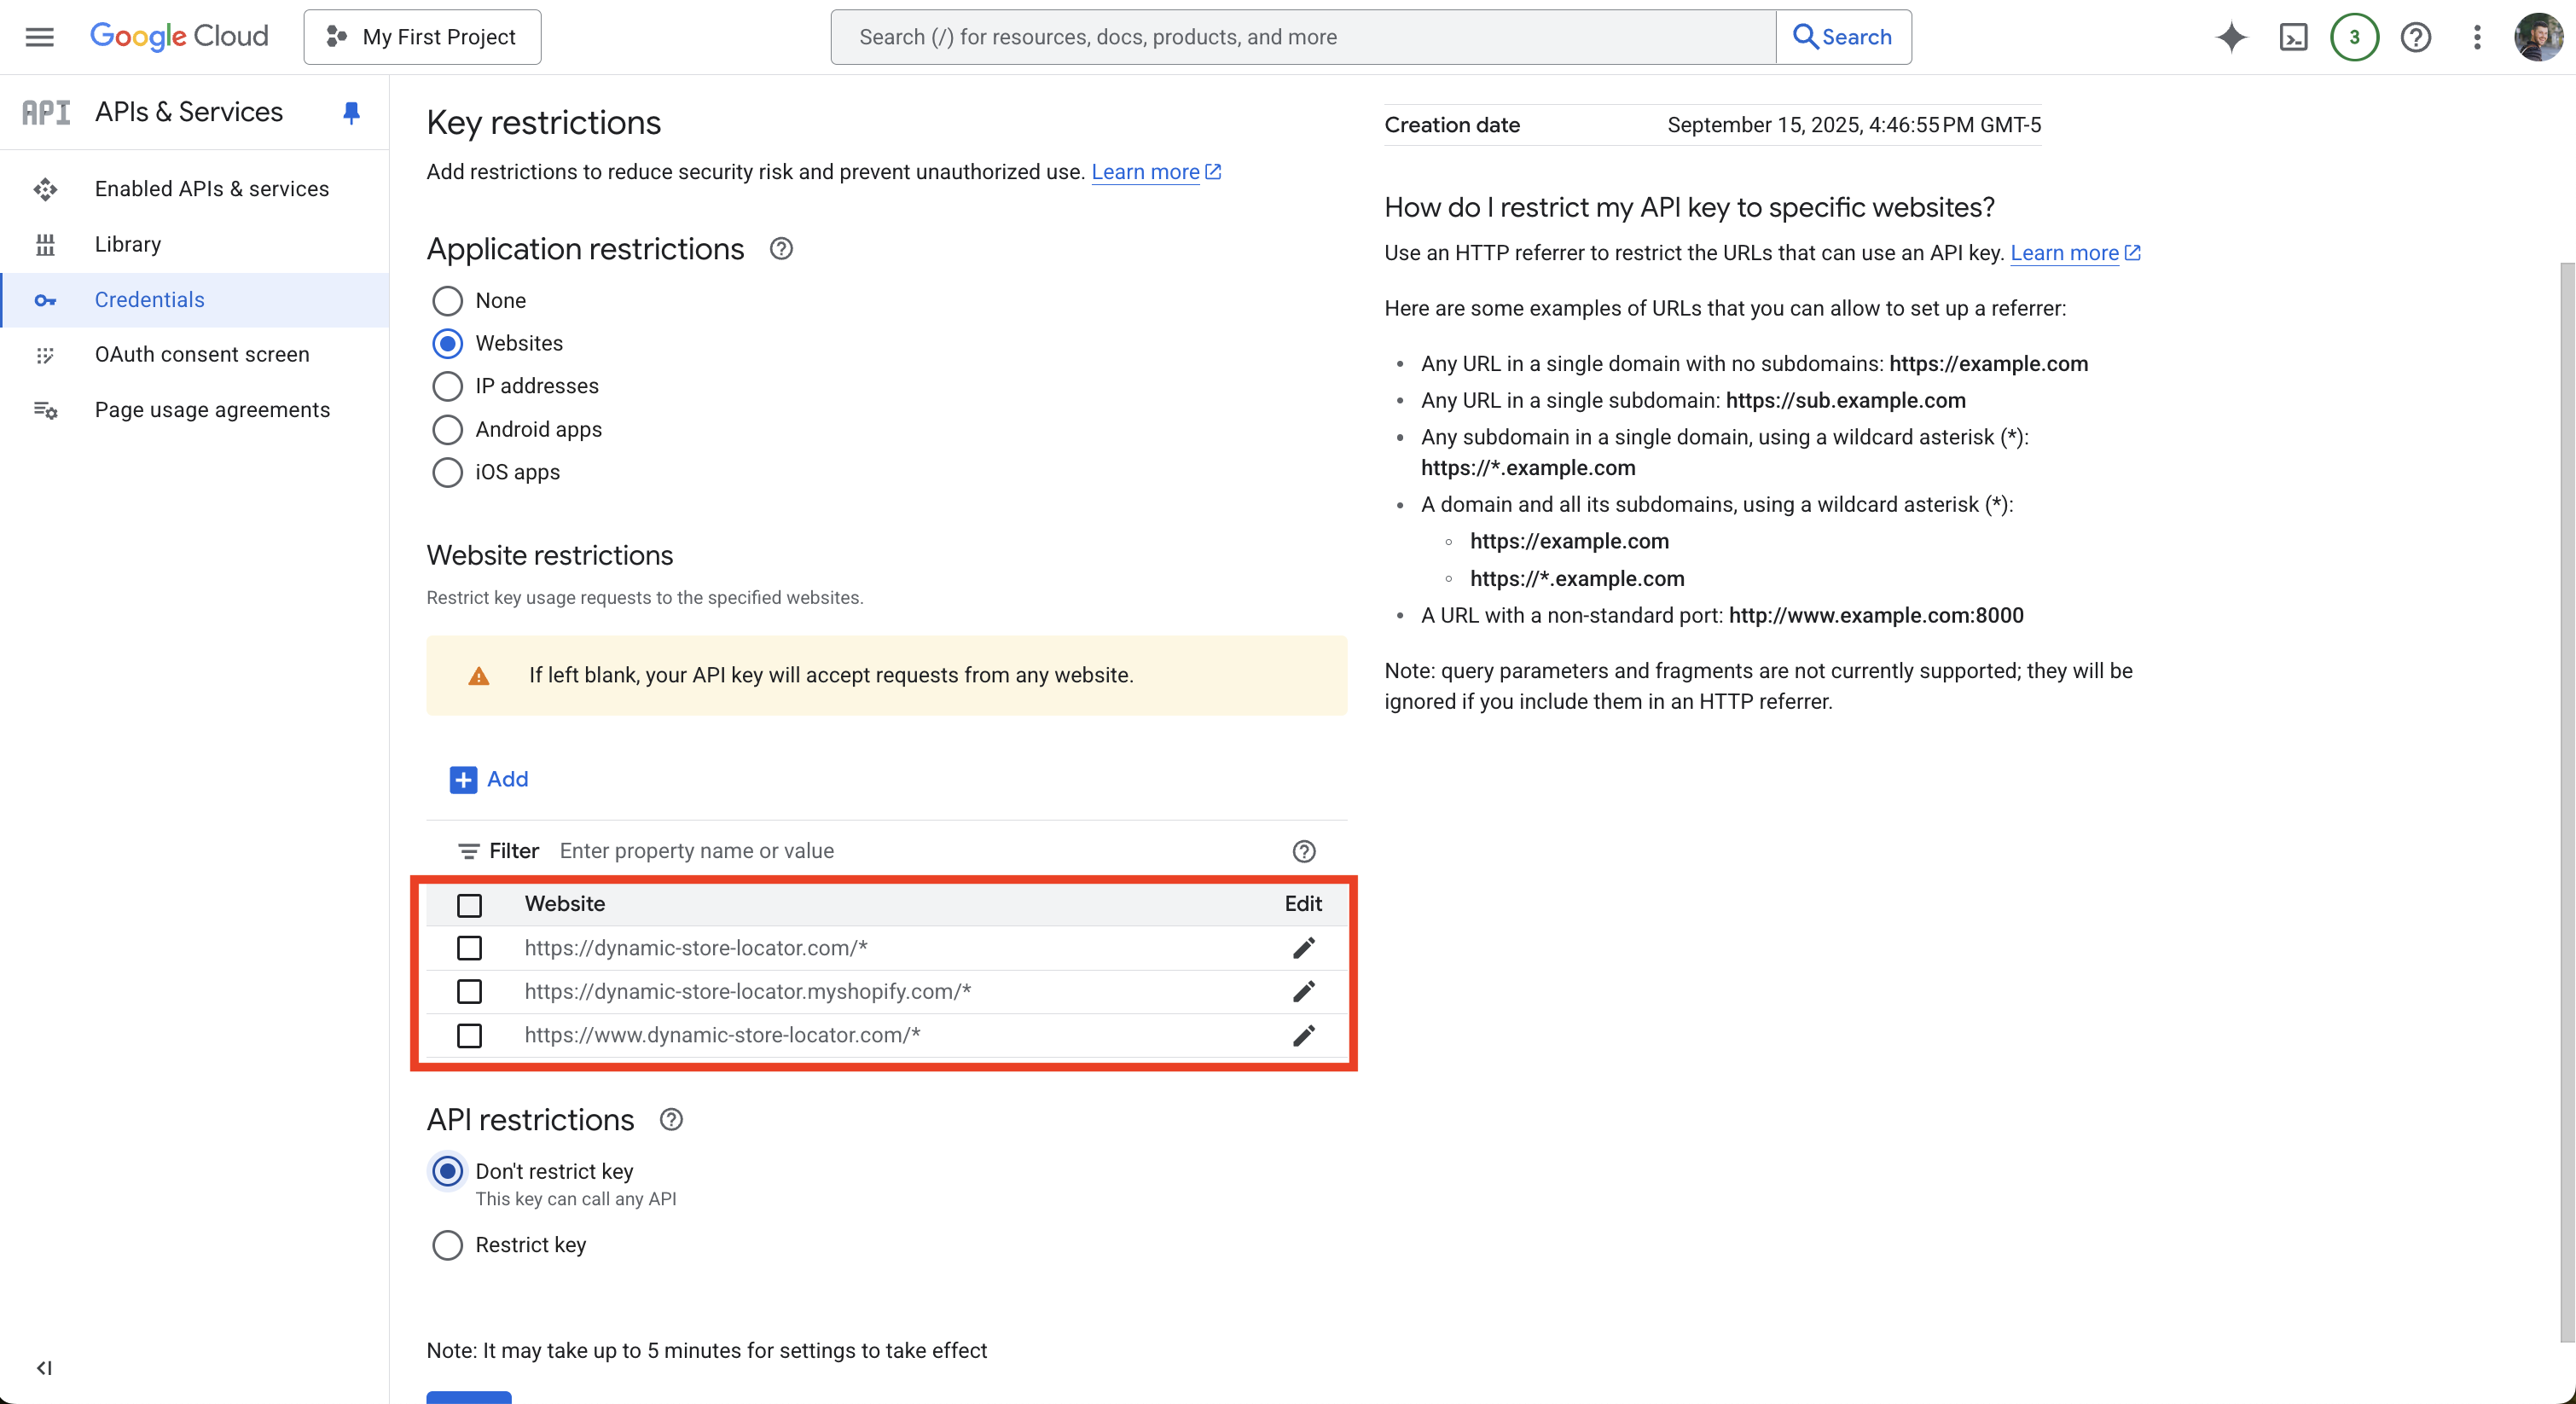
Under “Application restrictions” select “Websites” and then click “Add”.
You’ll need to add three websites here: your myshopify domain and two instances of your website domain.
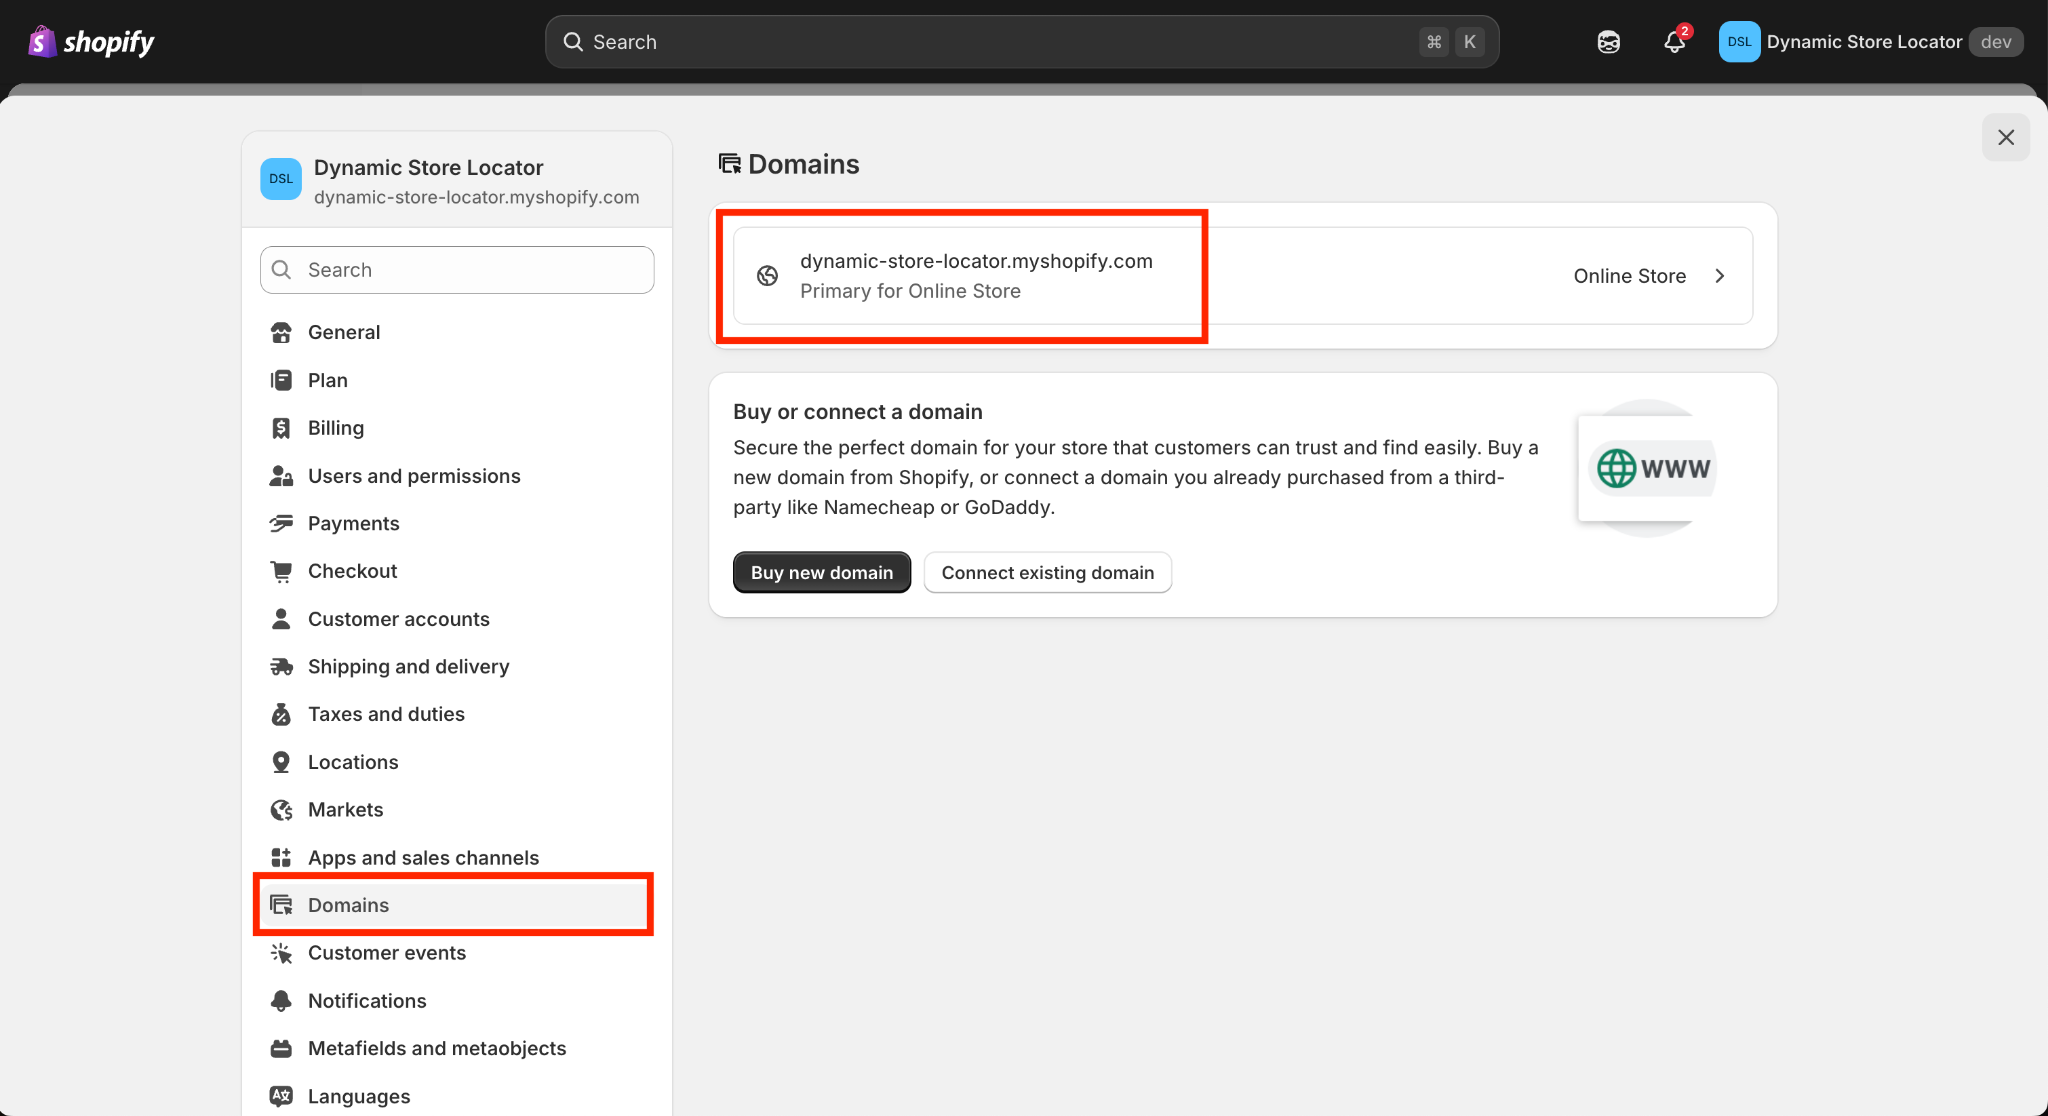
To find your myshopify domain, in the bottom left corner of your Shopify Admin, click “Settings” and then “Domains”. There will be a URL listed in the format of “______.myshopify.com”.
Copy that domain and paste it in the Google Cloud Console. It’s very important that you include the https:// or http:// before the URL, remove the www., and add a forward slash and an asterisk /* at the end of the domain (see the next screenshot, for example).
Next, add your website’s domain with “https://” and also make sure to add the forward slash and asterisk /* at the end of the domain. You must add two instances of your domain, one with the “www.” and one without it.
Again, please ensure the following:
- You've included either the https:// or http:// before the URL
- You've included a forward slash and asterisk at the end of the URLs like this: /*
- You've added two instances of your domain, one with www. and one without www.
When these three website domains have been added, it should look like this (but with your domains):
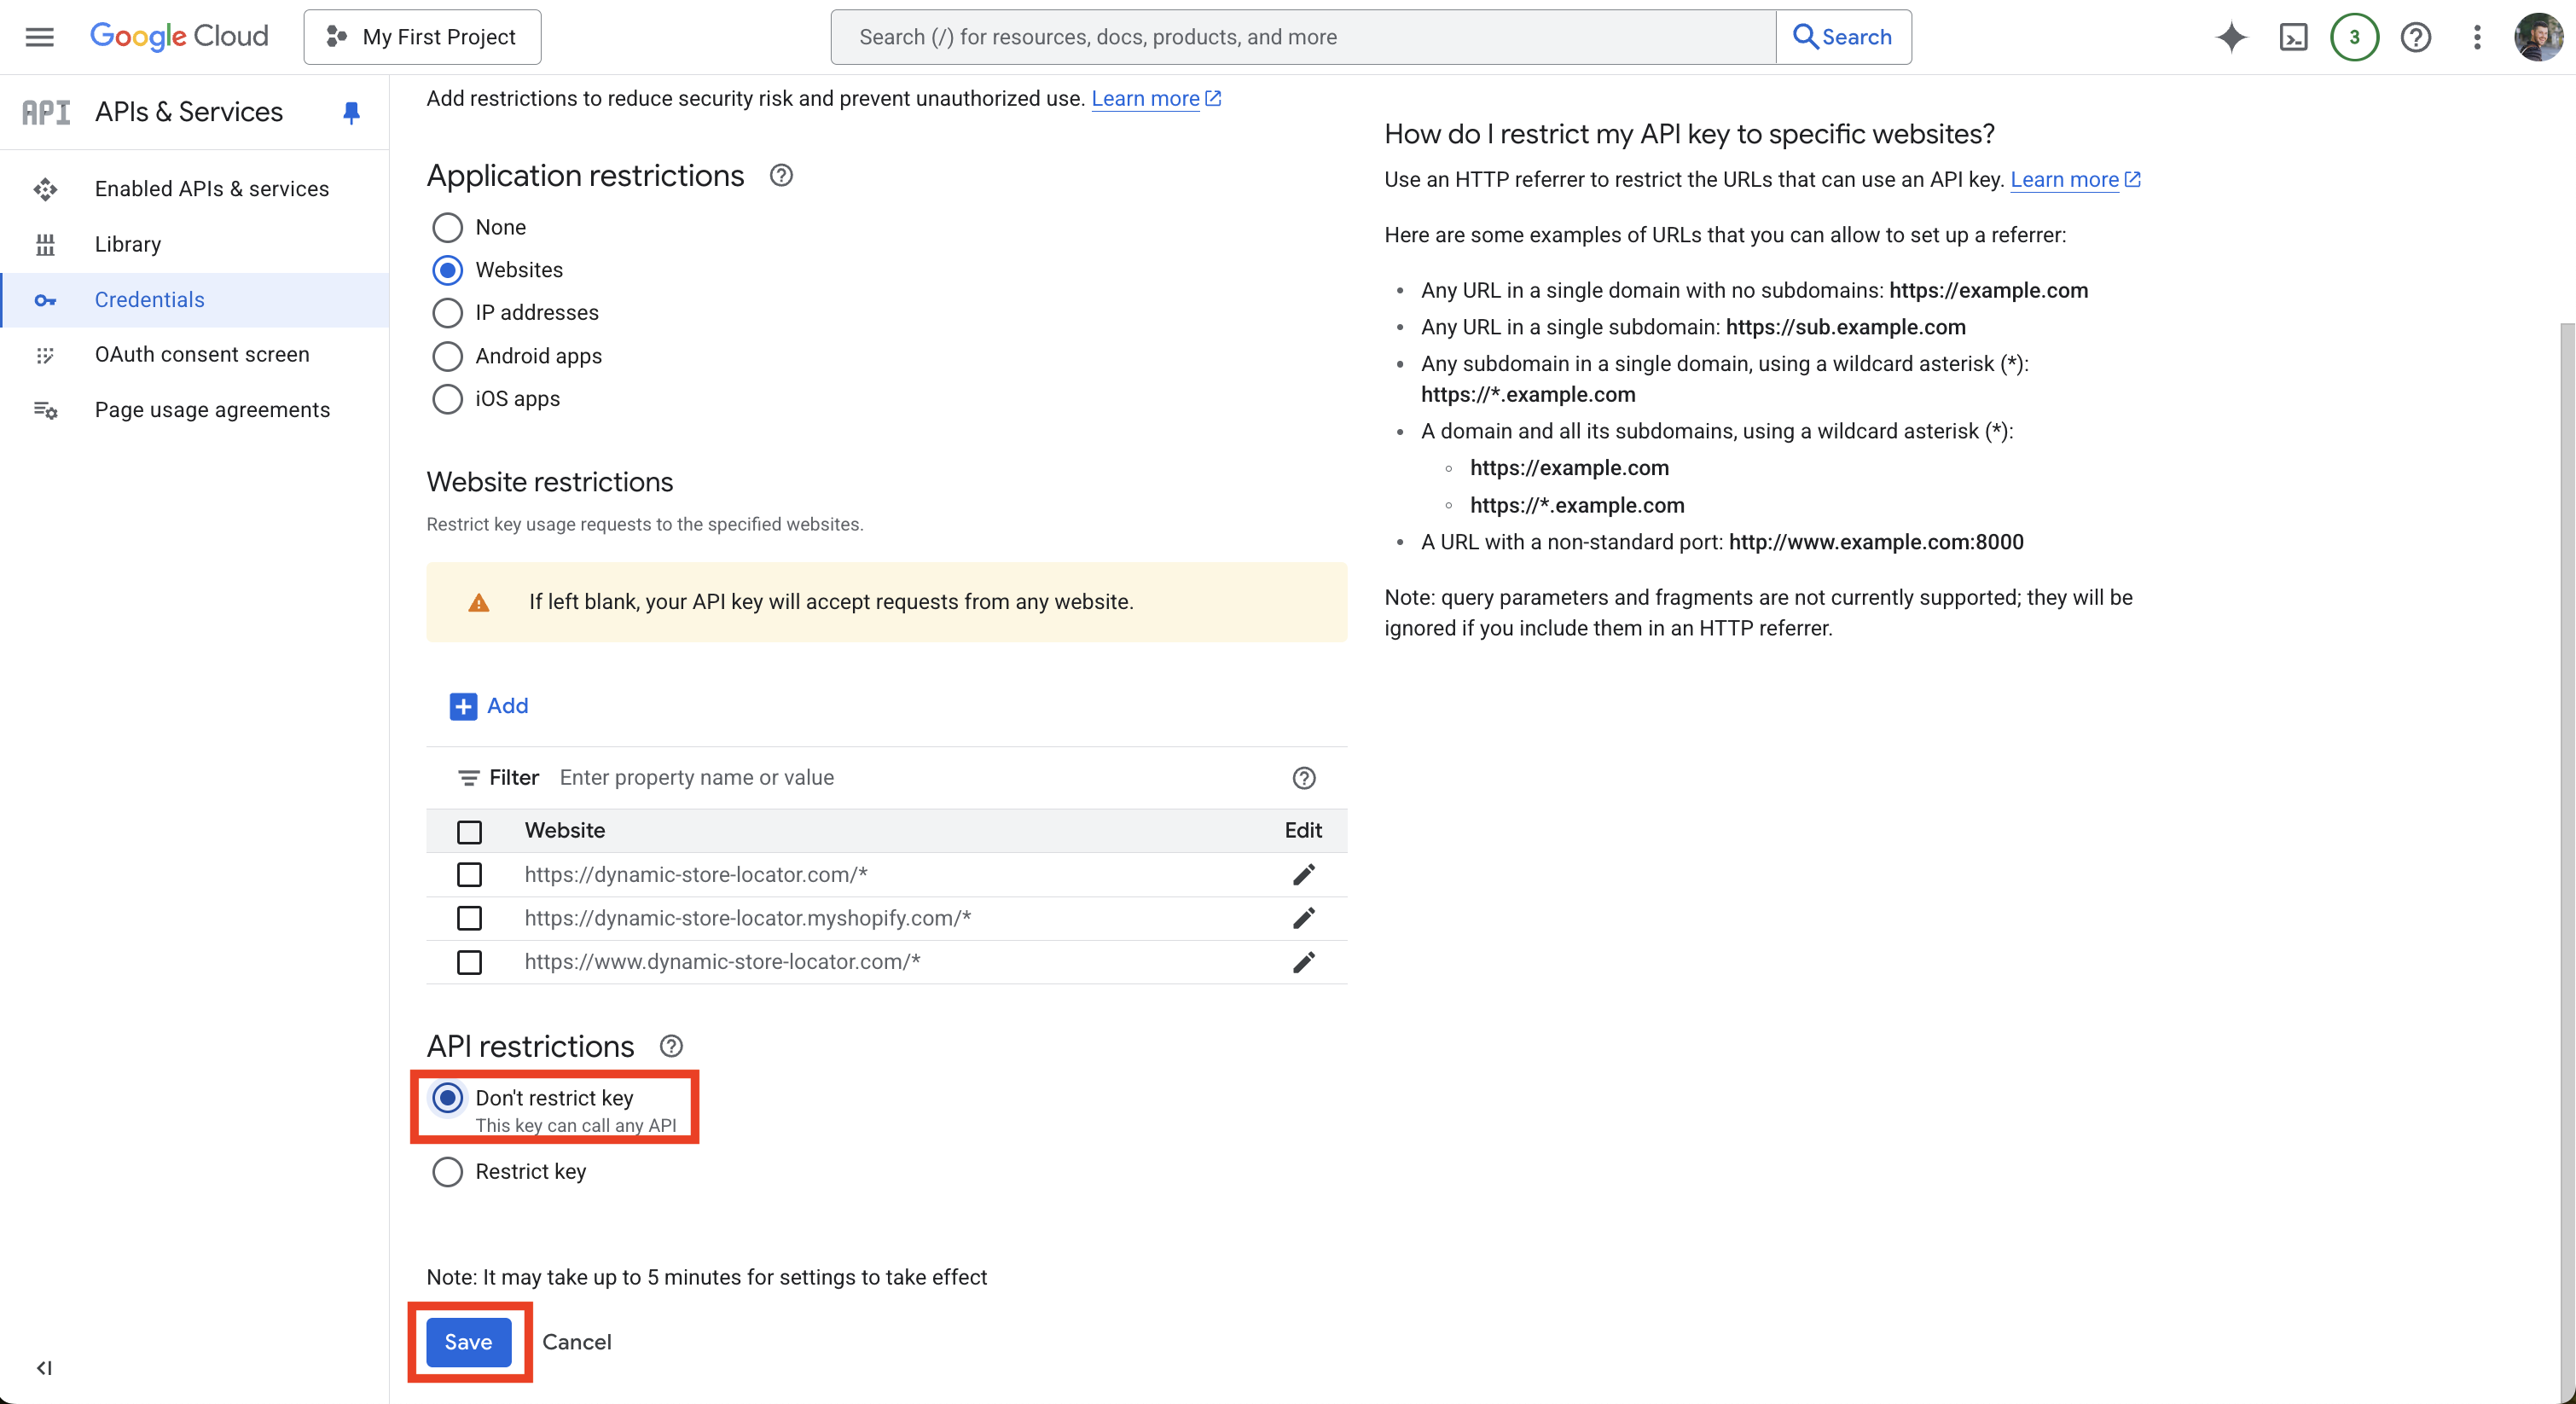
Next, under “API restrictions” make sure that you have selected “Don’t restrict key”.
Then press “Save”.
STEP 4: Activate Your Google Cloud Account
If you’re new to the Google Cloud platform, make sure that you’ve activated your account.
In the upper right hand corner, click “Activate”.

In the prompt that appears, again click “Activate”.

At this point, you’ll see a prompt to set up a budget alert. Again, you will only begin to be charged for using the Maps API once you’ve surpassed 10,000 visits per month to the map. If you’re worried about unwanted charges, you can set up billing alerts so that you’re forewarned before being charged. Click the “set a budget alert” link and follow the steps that Google has outlined here.

STEP 5: Copy Your API Key to the Dynamic Store Locator App
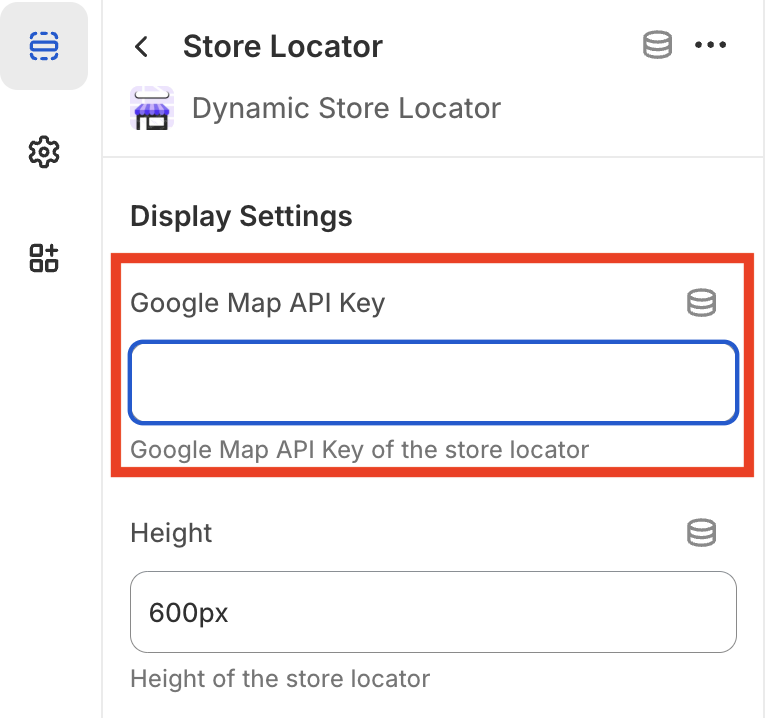
Now that you’ve successfully generated your Google Maps API Key, you’ll need to copy and paste your API Key in our app dashboard and in the theme that your map is on.
If you don’t have the API Key on hand from earlier in these steps, then from the Google Cloud Console, in the upper left hand corner click on the hamburger menu (the three stacked lines). In the dropdown, hover over “APIs & Services” and then click “Credentials”.
From the Credentials screen, find the “Maps Platform API Key” and click “Show key”.

Copy your API Key.

With your API Key copied, navigate back to the Dynamic Store Locator App in your Shopify Admin and paste your API Key in the field as shown below.

You'll also need to input your Google Maps API Key in the theme that your map is on, by following these directions:
- In your Shopify admin, on the left hand panel, click Sales Channels > Online Store.
- Next to the theme that you've added your map to – whether the live theme or a staging theme – click Customize. (Note: If you haven't yet added the map to your website, then please follow this guide before continuing: How to Add the Dynamic Store Locator Map to Your Shopify Website)
- In the theme editor, click the page selector at the top of the page (the dropdown that says "Home Page"). Then click "Pages" and find the page where you've added the map.
- On that page, click on the embedded map, which should open a menu panel on the left for the Dynamic Store Locator.
- Paste your API Key in the Google Maps API Key field and then click Save in the upper right corner.
Thanks for taking the time to properly set up Google Maps API Key and using our Dynamic Store Locator App!
Troubleshooting Common Problems
If your map isn’t displaying correctly and/or there’s an overlay on your map that says ‘For development purposes only’, here are three things to double-check.
Ensure that your Maps API Key isn’t restricted
API Key restrictions can interfere with the Dynamic Store Locator app. To troubleshoot this step, please go through the instructions we listed above in “STEP 3: Unrestricting Your API Key”.
Activate your full account on Google Cloud
Google Cloud starts everyone off with a free trial for 90 days, after which you need to go into their dashboard and enable your full account. There’s a good chance that your free trial with Google Cloud just ended and now you need to activate your full account in order to continue using their services.
- Go to cloud.google.com
- Login to the email account you used to create your Maps API Key (if you’re not already logged in)
- Click ‘Console’ in the upper right hand corner
- Once logged in, Google may prompt you with a popup to ‘Activate’ your account.
- Or, in the upper right hand corner of your Google Cloud dashboard, there will be a blue ‘Activate' button that you’ll need to press.
Enable billing in the Google Cloud project that houses your Maps API Key
While you may have already set up your billing details and put a card on file for your Google Cloud account, you need to make sure that billing has been enabled on the specific project that your Maps API Key was created in.
- Go to cloud.google.com
- Login to the email account you used to create your Maps API Key (if you’re not already logged in)
- Click ‘Console’ in the upper right hand corner
- On the Google Cloud Console homepage, under ‘Quick Access’, click the ‘Billing’ button.
If your project doesn’t have billing enabled, then you’ll see a message that “This project has no billing account”. Click ‘Link billing account’, then from the dropdown list, select your active billing account, and then “Set account”.
If your project does have billing enabled, then below the search bar, in the middle of the screen, click ‘Manage billing account’ and you should see the project name listed under “Projects linked to this billing account”.
For further troubleshooting of billing issues, see Google’s guide on “How to verify the billing status of your projects” or “How to enable, disable, or change billing for a project”.
If after troubleshooting the above problems, your map still isn’t populating correctly, then please submit a ticket with our support team by going to the Dynamic Store Locator app in Shopify > “Help Center” on the left column > Submit A Ticket.
Advanced Maps API Key Troubleshooting
If your map isn’t displaying correctly and/or there’s an overlay on your map that says ‘For development purposes only’, here are the steps to identify the exact issue causing the problem.
- Open your website in in a Google Chrome browser (you must use Chrome for this)
- Navigate to the page of your site where your store locator map is embedded.
- Right click anywhere on the screen and click ‘Inspect’.
- In the Inspect tool, select ‘Console’ from the top menu.

- Scroll down until you see a Google Maps error message.

- Identify the specific error message for your map listed to the right of “JavaScript API error:”
- Go to Google’s list of Maps API error codes here, locate the corresponding error message, and take the necessary steps they outline to solve the issue.
We are happy to help!
We offer FREE white glove installation assistance to all customers. Schedule an installation meeting here.